
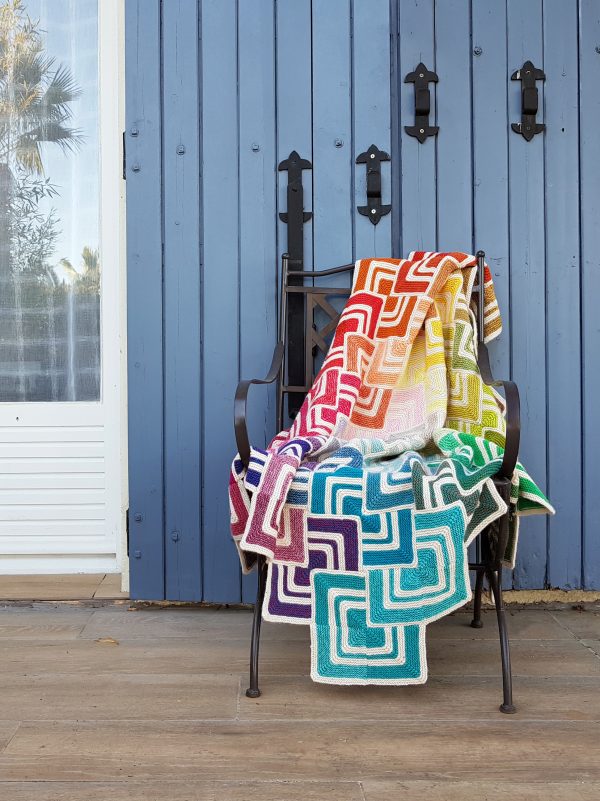
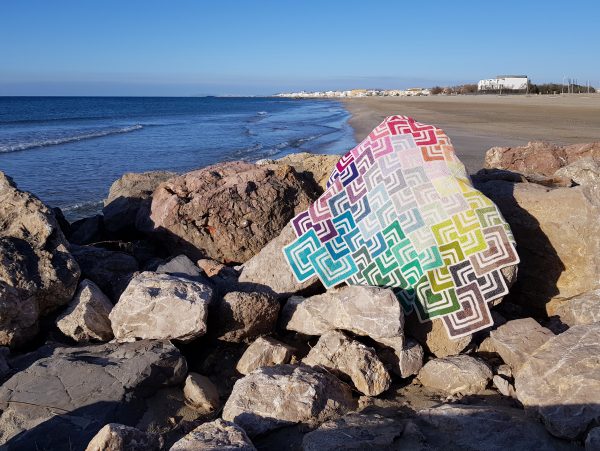
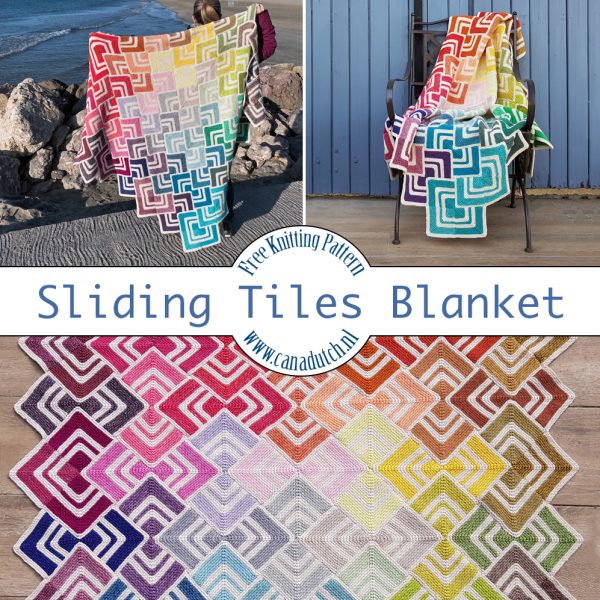
Hi everyone! As promised, here is the pattern for my Sliding Tiles Blanket! Check out this post for more photos and information about this pattern. Enjoy!
Hallo iedereen! Zoals beloofd is hier het Nederlandse patroon voor mijn Sliding Tiles Deken. Klik op deze blogpost voor meer foto’s en informatie over dit patroon. Veel plezier!
Did you know that the Sliding Tiles Blanket is also available as a handy printable PDF?
For a small fee you get access to a lovely full-colour PDF with photos as well as a printer friendly version with only the essential info. Not only that, but you will also recieve a bonus page with an alternative colour worksheet to help you put together your own colour layout, if you wish to do so!
Buying the pattern makes it easier to take with you on the go and also supports me as a designer!
Click here to get your PDF’s now!
Wist je dat het Sliding Tiles Deken patroon ook beschikbaar is als een handige printbare PDF?
Tegen een kleine vergoeding krijg je toegang tot een mooie full-colour PDF met foto’s en een printervriendelijke versie met alleen de essentiële informatie. Maar dat is niet alles! Je krijgt ook een bonuspagina met een alternatief kleurenwerkblad om je te helpen je eigen kleur layout samen te stellen, als je dat wilt!
Het kopen van het patroon maakt het makkelijker om mee te nemen onderweg en ondersteunt mij als ontwerper!
Klik hier om nu je PDF’s te kopen!
SLIDING TILES BLANKET PATTERN
Materials / Materialen
MC: Scheepjes Stone Washed (78% Cotton, 22% Acrylic; 10g/25m) 801 Moonstone x 11-12 50g balls
Note: Pattern is possible with 11 balls but better to get 12 if you want to be sure.
CC: Scheepjes Stone Washed / River Washed Colour Pack (58 colour version) (78% Cotton, 22% Acrylic; 10g/25m) x 1 pack
3.5mm needles
Stitch markers
HK: Scheepjes Stone Washed (78% Katoen, 22% Acryl; 10g/25m) 801 Moonstone x 11-12 50g bollen
Opmerking: Het patroon is te doen met 11 bollen, maar het is beter om voor de zekerheid 12 te nemen.
CK: Scheepjes Stone Washed / River Washed Kleur Pakket (58 kleuren versie) (78% Katoen, 22% Acryl; 10g/25m) x 1 pakket
3.5mm naalden
Stekenmarkeerders
If you would like to put your own spin on this project by using your own choice of colours, here’s a bit of info to help you along.
Als je je eigen draai aan dit project wilt geven door je eigen kleurkeuze te gebruiken, dan is hier een beetje info om je verder te helpen.
Yarn Amounts (Full Blanket) / Garen Hoeveelheden (hele deken)
11-12x 50g balls of MC / 11-12x 50g bollen HK
560g of CC (12 x 50g balls) / 560g CK (12 x 50g bollen)
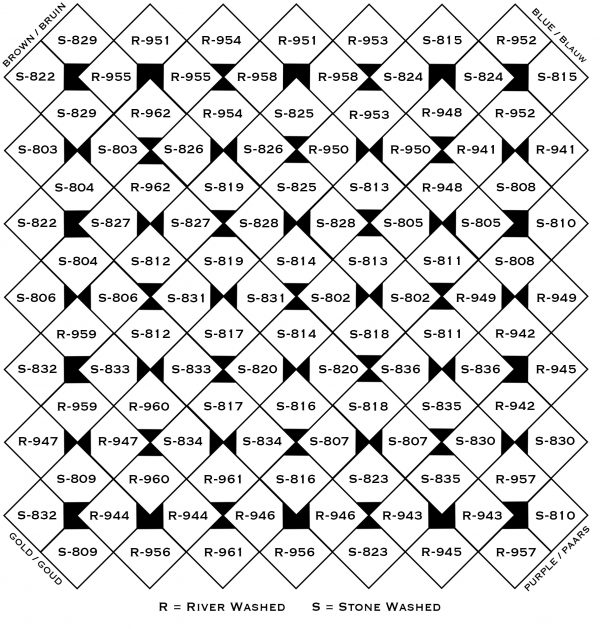
Blanket Tile Layout / Deken Tile Plaatsing
14 sets of 3 squares in matching colours (42 squares) / 14 sets van 3 vierkanten in bijpassende kleuren (42 vierkanten)
35 pairs of 2 squares in matching colours (70 squares) / 35 paar van 2 vierkanten in bijpassende kleuren (72 vierkanten)
Gauge / Tension / Stekenverhouding
One square = 11 x 11cm unblocked. Blocked to 12 x 12cm before joining.
Een enkel vierkant = 11 x 11cm. Opgespannen tot 12 x 12cm vóór het in elkaar zetten.
Measurements / Afmetingen
132cm x 132cm from point to point through the middle of the blanket.
132cm x 132cm van punt tot punt door het midden van de deken.
Abbreviations / Afkortingen
k knit
k2tog knit 2 stitches together; single right-leaning decrease
pm place marker
rm remove marker
RS right side of work
sm slip marker
ssk slip 2 stitches knitwise, knit these 2 stitches together through back loops; single left-leaning decrease
st(s) Stitch(es)
2afh.1r haal twee stn één voor één recht af, steek linkernaald van links naar rechts in de stn en brei ze recht samen
2r.sbr twee stn recht samen breien
CK contrastkleur
HK hoofdkleur
m afh haal de m af
mv markeerder verwijderen
pm plaats m
r recht
s/stn steek/steken
m steekmarkeerder
Pattern Notes / Opmerkingen
Please work to the given gauge as you may run into difficulty with running out of yarn with the mini balls if you work too loosely.
The pattern is written for 112 squares (two per colour). The colours 801 Moonstone and 821 Pink Quartzite were omitted due to them being too close to the MC, but can be used in the joining process, so they are not wasted.
Yarn can be carried up the side and anchored by picking up working colour from under non-working colour at the start of the rows. This edge will be hidden on the back of your work after joining your motifs and will not be visible. Carrying the yarn creates fewer ends and prevents running out of yarn with your CC.
One garter ridge = 2 knitted rows.
Probeer volgens de gegeven maat te werken, want anders kan het zijn dat het garen van de mini bolletjes op raakt.
Het patroon is geschreven voor 112 vierkanten (twee per kleur). De kleuren 801 Moonstone en 821 Pink Quartzite zijn weggelaten omdat ze te dicht bij de HK liggen, maar kunnen wel gebruikt worden bij het aan elkaar naaien, zodat je ze toch nog gebruikt.
Het garen kan aan de zijkant worden meegenomen en verankerd worden door aan het begin van de rijen de werkkleur van onder de niet-werkende kleur op te pakken. Deze rand wordt na het verbinden van de motieven aan de achterkant van het werk verborgen en is niet zichtbaar. Het meenemen van het garen zorgt voor minder gareneindjes en voorkomt dat het CK garen opraakt.
Eén ribbel = 2 rijen breiwerk.
Sliding Tile Square Pattern / Sliding Tiles Vierkant Patroon
Make 2 squaress for each colour in your pack, excluding colours Moonstone (801) and Pink Quartzite (821) – 112 squares.
Using the long tail cast on method and MC, cast on 50 sts.
Row 1 (RS) K23, k2tog, pm, ssk, k23. (48 sts)
Row 2 (WS) Knit to end.
Row 3 Knit to 2 sts before marker, k2tog, sm, ssk, knit to end. (3 garter ridges in MC. 46 sts)
Row 4 Knit to end.
Rows 5-16 With CC repeat rows 3 and 4 six times. (6 garter ridges in CC. 34 sts)
Rows 17-22 With MC repeat rows 3 and 4 three times. (3 garter ridges in MC. 28 sts)
Rows 23-26 With CC repeat rows 3 and 4 twice. (2 garter ridges in CC. 24 sts)
Rows 27-32 With MC repeat rows 3 and 4 three times. (3 garter ridges in MC. 18 sts)
Rows 33-46 With CC repeat rows 3 and 4 seven times. (7 garter ridges in CC. 4 sts)
Row 47 K2tog, rm, ssk. Two stitches left on needle. Slip right stitch over left, cut yarn and pull through to bind off.
Weave in ends and block to size (see measurements).
Arrange squares according to the diagram below and join using mattress stitch.
Maak 2 vierkantjes voor elke kleur in je pakket, behalve de kleuren Moonstone (801) en Pink Quartzite (821) – 112 vierkantjes.
Met HK, gebruik duim en wijsvinger methode (long tail cast on) en zet 50 stn op.
Rij 1 (GK) 23r, 2r.sbr, pm, 2afh.1r, 23r. (48 stn)
Rij 2 Brei alle stn r.
Rij 3 Brei tot 2 stn voor m, 2r.sbr, m afh, 2afh.1r, alle stn r tot einde rij. (3 ribbels in HK. 46 stn)
Rijen 5-16 Brei met CK volgens rijen 3 en 4 x6. (6 ribbels in CK. 34 stn)
Rijen 17-22 Brei met HK volgens rijen 3 en 4 x3. (3 ribbels in MK. 28 stn)
Rijen 23-26 Brei met CK volgens rijen 3 en 4 x2. (2 ribbels in CK. 24 stn)
Rijen 27-32 Brei met HK volgens rijen 3 en 4 x3. (3 ribbels in MK. 18 stn)
Rijen 33-46 Brei met CK volgens rijen 3 en 4 x7. (7 ribbels in CK. 4 stn)
Rij 47 2r.sbr, mv, 2afh.1r. Nu zijn er nog twee steken op je naald. Schuif de rechter steek over de linker steek, knip het garen af en trek de lus groter totdat deze uit de steek komt.
Hecht alle draadjes af en span tot de juiste afmetingen op (zie afmetingen).
Plaats de vierkanten volgens het onderstaande schema en naai ze samen met behulp van de matrassteek.
Sewing the Squares / Naaien van de vierkanten
When joining the squares, you will be either be joining two sides, or one side and one cast on edge. The cast on edge is quite straightforward, but here is a video showing how you join on the side of garter stitch.
Bij het aan elkaar naaien van de vierkanten worden ofwel twee zijkanten van het vierkant samengevoegd, ofwel een zijkant en een kant van de opzetrand”. Het naaien van de opzetrand is vrij eenvoudig, maar hier is een video die laat zien hoe je aan de zijkant van de ribbelsteek naait.
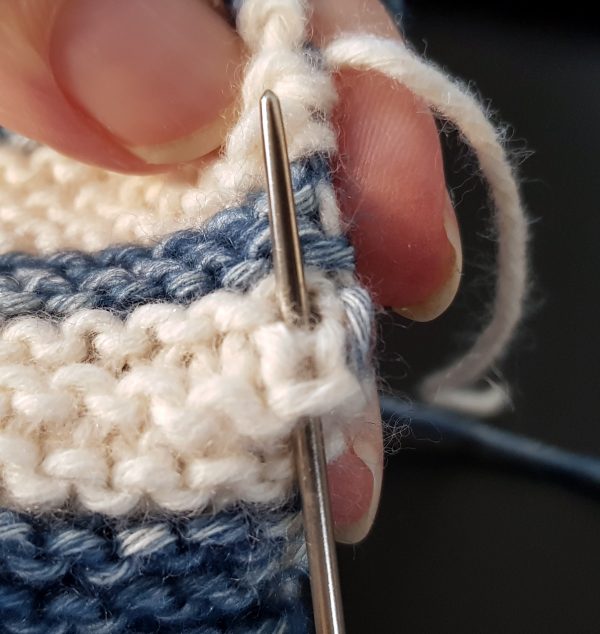
PLEASE NOTE: I work one stitch closer to the edge for my join than Staci does in her video as it makes a flatter join for this blanket. Here is a photo that shows how I went through the side stitches on my squares when joining. I go through the same loops as in the videos, just one stitch closer to the edge.
LET OP: Ik werk één steek dichter bij de rand voor mijn join dan Staci doet in haar video, want het maakt een plattere join voor dit deken. Hier is een foto die laat zien hoe ik tijdens het naaien door de zijsteken op mijn vierkanten ben gegaan. Ik ga door dezelfde lussen als in de video’s, alleen één steek dichter bij de rand.
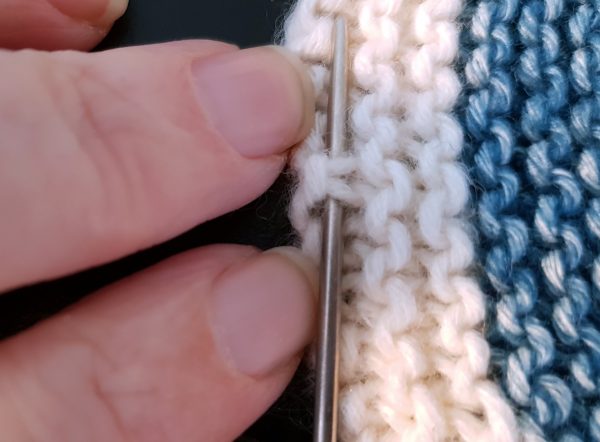
Here is how I go through the stitches on the cast on edge.
Hier is hoe ik door de steken van de opzetrand ga.
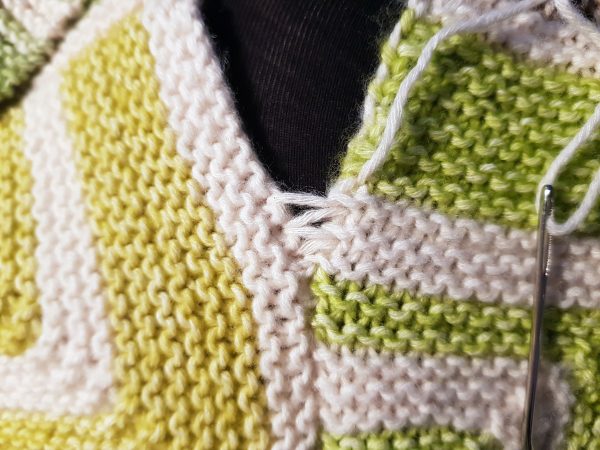
When working with Stone Washed and River Washed, be careful to not weave too many stitches at once, or you will have trouble pulling your join closed. Do small amounts at a time, pulling them closed as you go, as in the photo below.
Als je met Stone Washed en River Washed werkt, let er dan op dat je niet te veel steken tegelijk naait, anders heb je moeite om hem dicht te trekken. Doe kleine hoeveelheden per keer, en trek het gaandeweg aan zoals op de foto hieronder.
I hope you enjoy making this design! For questions and support I can also be found here on my Facebook community!
Be sure to share your finished project on Facebook and Instagram using the tags #SlidingTilesBlanket and #Canadutch so I, and others, can be sure to see it.
You can also click here to add the Sliding Tiles Blanket to your favourites on Ravelry!
Below is a handy photo for if you want to save the pattern to your Pinterest boards or on other social media.
Ik hoop dat je geniet van het maken van dit ontwerp! Voor vragen en ondersteuning ben ik ook hier op mijn Facebook community te vinden!
Deel je voltooide project op Facebook en Instagram met de tags #SlidingTilesBlanket en #Canadutch zodat ik, en anderen, er zeker van kunnen zijn om het te zien.
Je kunt ook hier klikken om Sliding Tiles Blanket aan je favorieten toe te voegen op Ravelry!
Beneden staat een handige foto voor als je het patroon wilt opslaan op je Pinterest boards of op andere social media.
Where To Buy / Waar te koop
UK and International buyers will find Stone Washed / River Washed yarns at Woolwarehouse and Black Sheep Wools.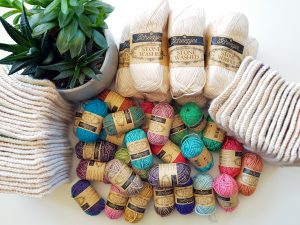
Canadian and International buyers have a great option with Knotty House.
Those of you in the Netherlands can find yarn packs at Caro’s Atelier!
You can also ask your preferred Scheepjes retailer or find a shop near you!
UK en Internationale kopers kunnen Stone Washed / River Washed garens vinden op Woolwarehouse and Black Sheep Wools.
Canadian en Internationale kopers hebben een geweldige optie bij Knotty House.
Degenen in Nederland kunnen kan pakketten vinden bij Caro’s Atelier!
Je kunt ook je favoriete Scheepjes-dealer vragen of een winkel bij jou in de buurt vinden!
This post contains affiliate links. This is a way for you to support Canadutch and me as a designer. It is no extra cost to you, but if you shop via one of these links, I get a small percentage of the sale!
Copyright 2020, Tammy Canavan-Soldaat. This pattern and pictures are the property of Tammy Canavan-Soldaat. All rights reserved. Pattern is available for personal use only. No unauthorized reproduction, in whole or in part, or distribution of this pattern or content, including text or pictures is allowed. Any patterns derived from the original must be with the permission of the designer herself, name cannot be used for other patterns. You may sell items made from this pattern.
Thank you so much, your design is beautiful and so inspiring. I’ve been searching for ideas to use up my colour pack and this is so perfect. I’m also really excited to take up knitting again. Heartfelt thanks ❤
I’m about to start this having been given the yarn for xmas. I’m really looking forward to adding it to my year of knitting blankets, with a minor bit of gauge terror for good measure! =D What did you find was the best way to block the squares prior to sewing together, a full blown wash, a lighter spray down or somewhere in between? Thanks.
Hallo, daar dacht ik ook iets over na, maar ik besloot het op internet te zoeken, toen vond ik deze site en ik vond hier een aantal interessante zinnen, ik hou echt van de manier waarop je het uitdrukt en je show om het te schrijven .. Ik hou van de manier waarop je het bepaalt. Perfect!
I am making this right now! I work night shifts as a nurse, and I can usually get one set of 2 squares done each shift. Sooooo pretty, I bought a second Cutie Pie pack to make another one!
This blanket is so pretty. I was wondering if you have a suggestion on how I can enlarge it to maybe 66×66 inches. thank you so much.
Linda