
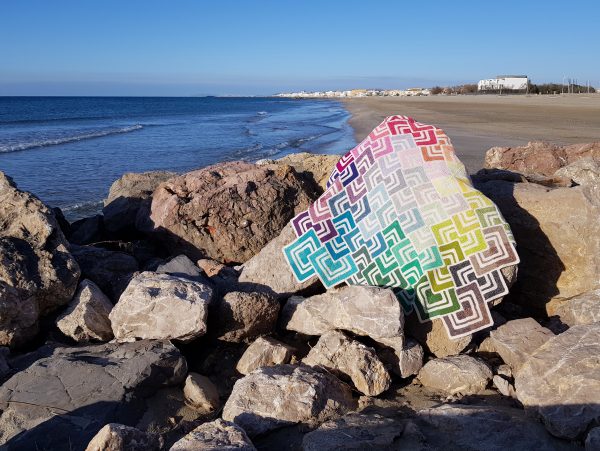
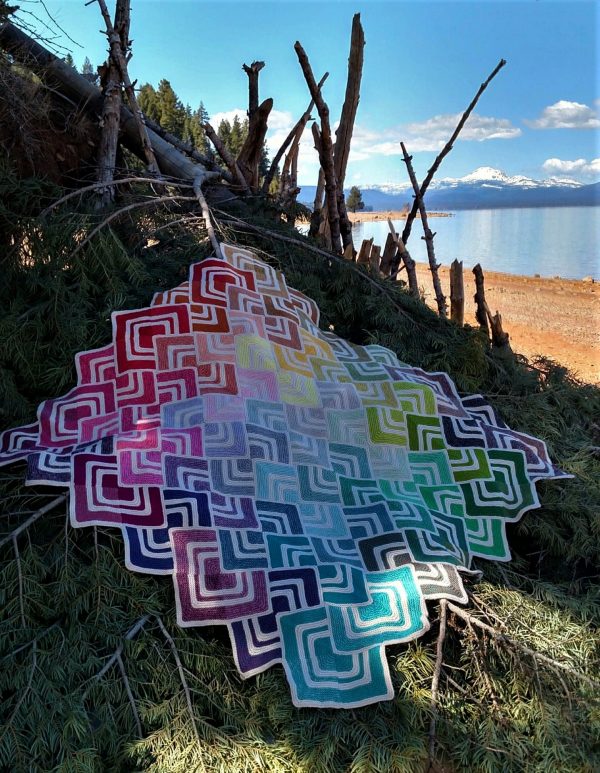
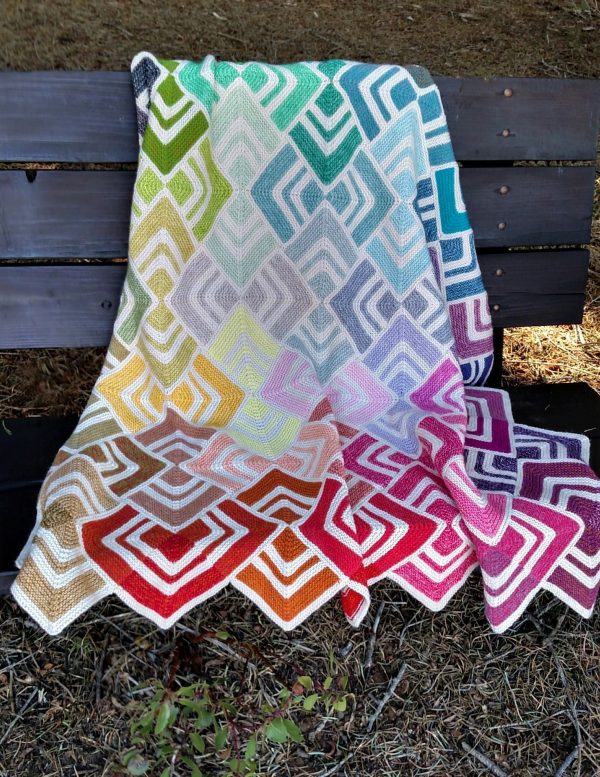
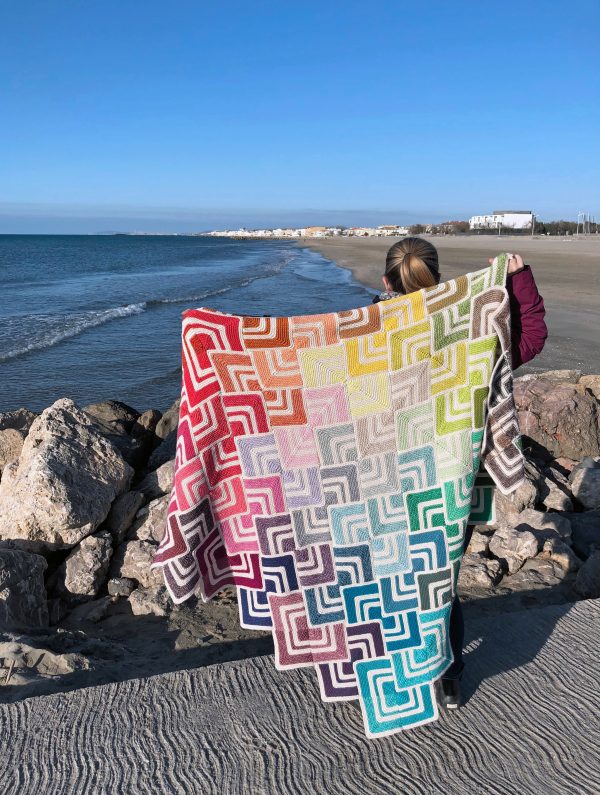
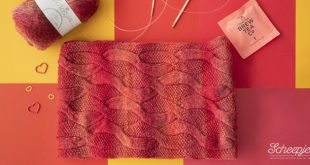
I’m so happy to finally show you my Sliding Tiles Blanket. Yes, it has a name! I put a call out to my Scheepjes Bloggers to help me think of a name, and after some discussion, Simy Somer mentioned that it reminded her of one of those sliding tile puzzles we used to do back in the day, remember those?!
 Maybe some of you are too young to remember, but I’m in my mid 40’s and when I was a kid, my parents used to throw one of these in my direction when they needed to keep me distracted for a while.
What an awful little monster I must have been to raise, because if I can be real here for a second… I used to get frustrated and pop those suckers right out of there and then snap them back in. I’m a bit torn on whether it was a good or bad thing, really. Maybe I lacked patience, or was too dumb to figure out the puzzles before the frustration set in, but I was also smart enough to not waste more time on it than I had to.
I guess it would depend on who you ask, and since this is my blog and my rules, I’m going with smart enough!
I honestly tortured myself for ages for a name and I don’t remember when I last had so much trouble thinking of one, but once I heard the Sliding Tiles, I knew that was the one.
 Two photos above: Photos and test knitting by Theresa Pearson
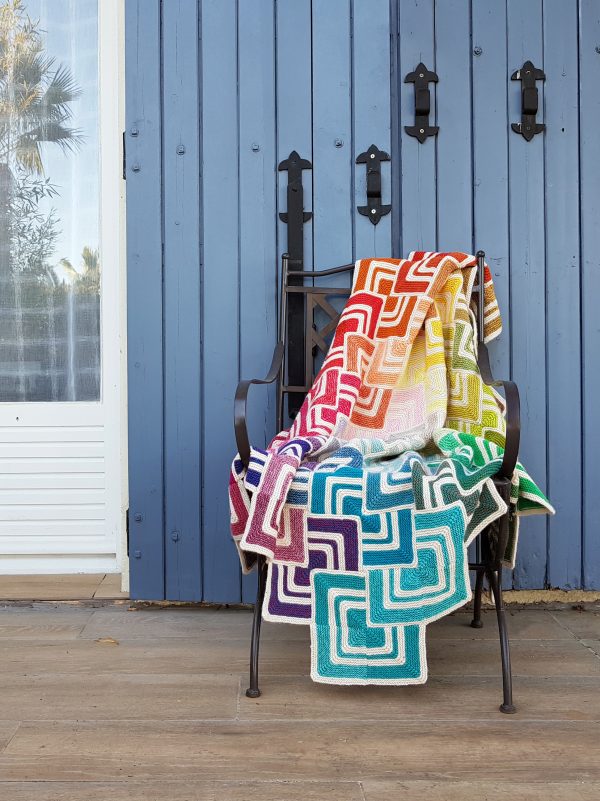
*The blanket is possible to make the blanket with 11 balls, including the join, but if you want to have a little extra wiggle room for personal tension or longer tails for your join, I’d suggest buying 12 to be sure you have enough.
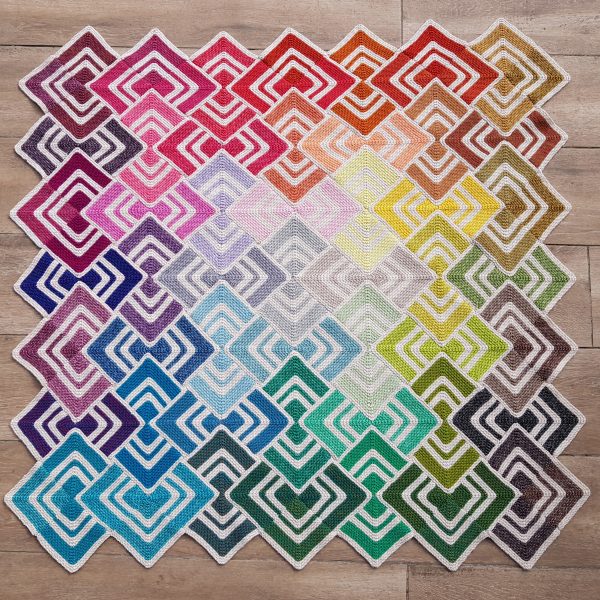
What took me longer than the name, was the layout. I’d mentioned this in my previous post but couldn’t go into it in too much detail until I showed it. The challenge, and my goal, with this design layout was trying to use all of the colours in a unique way. I had 112 squares, which was two squares for each colour from the pack that was used.
I tried many, many variations but I kept coming back to this same idea of the overlapping tiles. The most challenging part was trying to use all of the squares. In the beginning, I planned to do the tiles in a random order, placed all over the blanket. Once I had this laid out, the edges bothered me, because it left me with what I called ‘orphan’ tiles sticking out on the edges with no match.

You can see what I mean in this quick photo I took at the time, shown above. The blue lines point to the ‘orphaned’ tiles and I just found it all a bit too chaotic. I needed more order in the layout.
I decided that I wanted to try to create a gradient and to close the edges. In order to do this, I had to find the closest colour matches within the colour range available in the pack, that allowed me to break up one set of two squares, and match each of them to two other pairs. This meant that not all of the edge squares would be exact matches, but I was still ok with that because when I finally got the puzzle pieces all in place, I loved the finished blanket so much!
Here is a better photo of the full blanket laid out. Excuse any wonkiness, I was standing on a stool on a windy day and I kept having to get off to flip it back over. After a while I gave up on trying to pat it out into its most pretty of forms. I was trying to take a photo and felt like I was taking a step class!
So that’s it, after a zillion years, a zillion changes in plans and a zillion more distractions, this blanket is finally finished and presented to the world!
I will be back soon with the finished pattern, which will include a diagram for this layout as well as information on yarn amounts for if you want to use the regular 50g balls. It will, of course, be possible to put together your own layouts as well, using the mitered square pattern.
Hope you like it as much as I do!
BLOOPER REEL!
That moment when you try to take photos of a blanket and the wind just wants to blow you out to sea.

Where To Buy
UK and International buyers will find Stone Washed / River Washed yarns at Woolwarehouse and Black Sheep Wools.
Canadian and International buyers have a great option with Knotty House.
Those of you in the Netherlands can find all you need at Caro’s Atelier.
You can also ask your preferred Scheepjes retailer or find a shop near you!
This post contains affiliate links. This is a way for you to support Canadutch and me as a designer. It is no extra cost to you, but if you shop via one of these links, I get a small percentage of the sale!
I am in process of making this pattern. Twenty three squares in, to be exact. I’ve started to think about how one finishes this. How do you recommend blocking the squares before arranging them according to the diagram? I’m used to washing wool with Eucalan and then spreading it and pinning it on a surface. Don’t know how to block cotton/acrylic. Is there something on YouTube you can direct me to? Or on another website? Thanks in advance.
Hi Maria! I blocked my squares in batches using my salad spinner, blocking boards (foam play mats) and knit blockers. I put water, a bit of Eucalan and a colour catcher in the salad spinner, with 12-15 squares to soak for 15 mins or so, and then poured the water into another bowl and spun the water out of the squares. I would reuse the water as long as there was no colour running (there usually wasn’t). I have a salad spinner dedicated to blocking small items and it has been the best discovery and time saver ever! Once they were spun, I used the knit blockers to block them to size and shape and once they were dry I repeated once I had enough done for another batch. The amount I did at once was purely due to the amount I could fit on the boards with the amount of knit blockers I have. I probably could have fit more but didn’t have the supplies to block more at once.
Finished your Sliding Tiles Blanket. t was so much fun, and I’m getting so many compliments. Thank you.
I love this. I am a knitter, but I keep falling in love with the patterns and colours of crochet rugs. There seems to be a new CAL every week and I was starting to despair of finding a knitting project for my colour pack . It is such a joy to find a gorgeous knitted blanket that has such incredible visual impact!
I am half way through the Read between the Lines shawl which I also love. Thank you Tammy for creating such elegantly simple but beautifully constructed patterns that use colour so innovatively. <3
Love this! I’ve been saving my little squishies for the right pattern and I think this is it! It’s so colourful and happy without being just rainbow. Thank you for this! Can’t wait to cast on!
I love this! I am new to yarn arts, and I am wowed by the beauty of this. I’m gonna give it a go with a crochet hook, and I’m sure this will teach me a lot of lessons.
Thank you!!!
Hi Dannielle, thanks for your message. I’m so happy you like the blanket! However, please read this post that I shared just before the blanket release. I think there may be another lesson in there. No malice, just something I need my crochet friends to know.
http://www.canadutch.nl/wordpress/archives/17979
Aw I’m sad. I’m so new to crochet And yarn arts in general, and I just fell in love with this as soon as I saw it.
I wasn’t trying to offend. I’m sorry if it came off that way. I’m in awe of the work this must have taken. Well done.
I hope you don’t mind, but I’m still going to try and figure it out with my hook when I’m a bit more confident in my skill level.
I want to make this!! I have put away knitting for a long time and recently decided to conquer it again! I don’t have a stone/river pack but I do have rainbow colors of sunkissed and cotton 8 I may try. Love the looks of it!
If you do try be sure to share photos so I can see, I’d be really curious to see how it works up! :)
Comes this pattern in a booklet? The yarn after party as well, it is beautiful!
Love, Arja
No this is my own release, not a commission through Scheepjes. There are printable PDF’s available on Ravelry, though. You can find it here:
https://www.ravelry.com/patterns/library/sliding-tiles-blanket (as well as for free in a new post here on my blog)
Gorgeousssss blanket and LOVE the photos xxxx