

I have chosen a winner for the giveaway, which you can read about here on my first week WIP blog. Feel free to still follow me and connect on social media as I’d love to see your projects and what crafty fun you are up to!
Happy New Year and welcome to the start of the Twisted Roots MAL! I still can’t believe that it’s 2021 already, I feel like I am in a bizarre time warp where time moves too slowly and too quickly all at the same time! It’s not just me, right? Anyway, I’m so happy to be sharing this project with you and I’m sure we are going to have a lot of fun during the MAL!
I will be sharing lots of photos and info in this post, but first – the GIVEAWAY!!
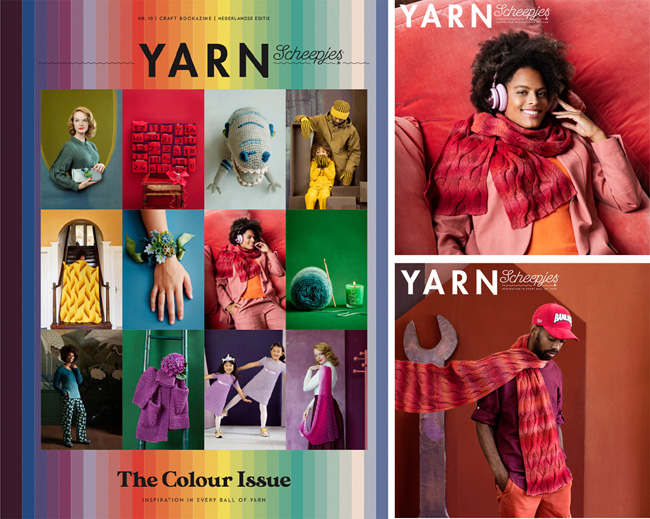
To celebrate the start of the new year and the kick-off of the MAL, I am hosting a giveaway on my social media. On January 10, 2021, I will randomly choose the lucky winner who will receive the yarn and Bookazine from Scheepjes. Then they can make a Twisted Roots scarf of their own in the colourway I designed!!
To enter the giveaway do one of the following (or both, for double the chance!):
- Follow me on Instagram and leave a comment on my MAL and giveaway post.
- Like my Facebook page and leave a comment on my MAL and giveaway post.
It’s that simple! Tagging friends or sharing on your own social media isn’t mandatory but I’d really appreciate it if you would! It also gives your fellow knitters and yarn lovers a chance to win too! ❤️
I love hosting giveaways so much! There’s quite a quick turnaround on this one so that once the winner is chosen we can try to get the yarn out to them as soon as possible. What a fun way to start the MAL, right?! Good luck, everyone!
The official hashtags for the MAL are #ScheepjesMAL #TwistedRootsMAL #YARNTheColourIssue #YARN10, don’t forget to use them when sharing your project on social media!
You can also click here to add the Twisted Roots Scarf to your favourites or cast-on on Ravelry.
MAL Info and Support
The first thing you are going to want to do to prepare for the MAL is to join the Official Scheepjes Facebook groups. I will be there, together with the fabulously helpful mod and admin team and a wonderful community of crafters. It’s a great place to get support and chat with people who share your love of yarn and crafting!
Join the Official International (English) Scheepjes Group
Join the Official Nederlandse (Dutch) Scheepjes Group
All you need to know coming into this MAL is how to cast on, knit and purl. Once you know that, you are already 95% of the way there. I will try to give you as much info in this post as I can, but if you get stuck or feel you need something explained further, you can always come and ask in the Facebook groups and we’ll be happy to help you.
MAL INFO AT A GLANCE:
DATES: January 6 – 27, 2021
Pattern available in Scheepjes Yarn 10 Bookazine: The Colour Issue
Pattern languages: English (UK terms) and Dutch
Skill level: Adventurous Beginner
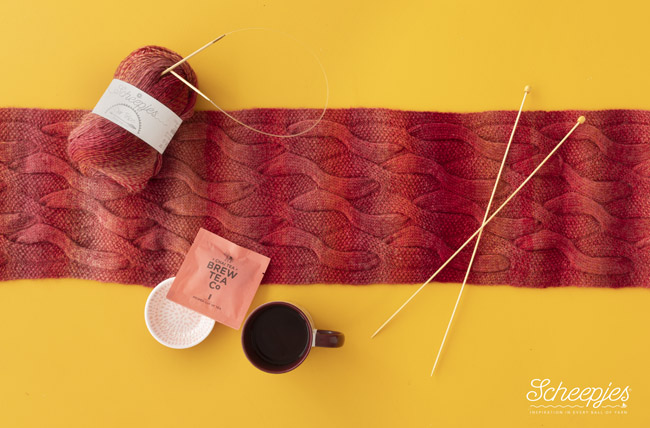
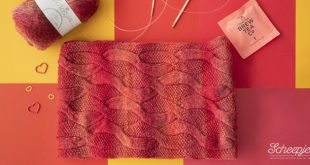
Yarn: 3 x balls Scheepjes Our Tribe
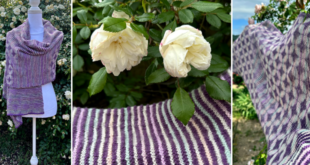
Photo example colours: Red 968 Happy in Red, Blue 975 Canadutch, Tutorials 965 Felted Button
Needle Size: 4mm (may differ depending on personal tension).
Needle Note: Straight or circular needles work. I used interchangeable circular needles with a 40cm cable.
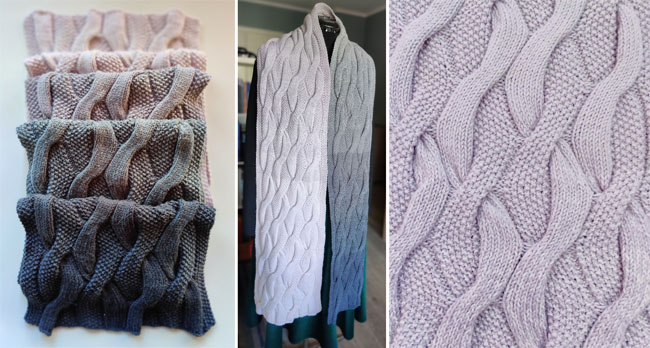
Measurements: 235 x 30cm (92.5 x 12in) after blocking
Additional Supplies: Cable needle, blocking materials, stitch markers (optional)
Pattern Information and Tips
As I mentioned above, there really isn’t a whole lot of knitting knowledge required for this project. I will have some general knitting tips for new knitters a little further in my post but assuming you already know the basics, the only thing I really have to show you is some information about the working tension, how brackets work and cables. I think these are the most important bits of info that you will need right now. If you already know how to work cables, feel free to skip that section but I urge everyone to read the information below regarding the importance of checking your gauge and using the correct tension for this project.
Cable Noodles and Why Tension and Blocking Matter
Please note that the advice in this section is purely for those who want their scarf to have the same results as in the original scarf in the photos. This is your project, and you get to decide, so if you like cable noodles that’s ok too!
As I mentioned in my previous post, the tension for this project is purposely loose, so be sure to do a gauge swatch according to the info given in the pattern. If it feels looser than you are used to, please ignore the instinct to go down in needle size. The loose, fluid texture is necessary to block the shawl into shape later. If you knit this piece too tightly, your cables may bunch up and will likely bounce back into cable noodles after blocking. Knitting looser stitches allows the cables to spread and flatten so that you get the desired look and feel of the original design.
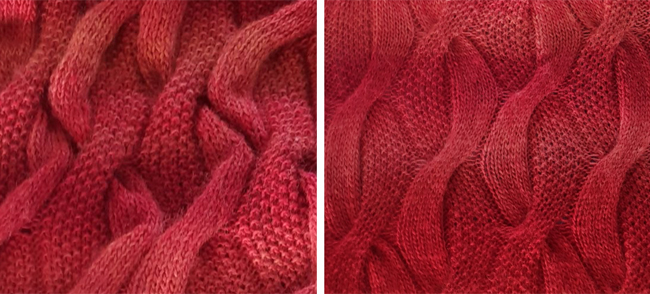
Here is a side by side visual of my original scarf before and after test blocking the scarf to make sure the cables would settle properly. As you can see, there is quite a difference! It’s the same scarf just at a different time of day, in different lighting, having been blocked in between. While making your scarf, it will look like kinky, wobbly cable noodles, and this is totally normal, so don’t panic! If you work to the desired gauge (or even a little looser) it’s fine, you just want to be careful not to knit too tightly or your scarf may just decide it likes being noodles and wants to stay that way, whether you like it or not. 😆
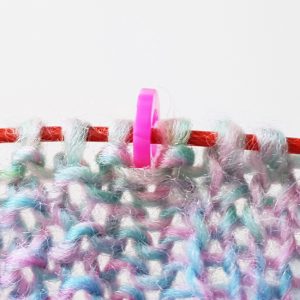
Making Use of Stitch Markers
So you’ve cast on your scarf and are ready to start knitting! If you are like me and you like to use stitch markers as reminders of when to change stitch pattern or mark points in your work, then here’s what I found worked for this project.
Scheepjes Our Tribe – Felted Button (965)
Your scarf is made up of edge stitches on each side and the columns of your cables. Each of these sections is separated by a pair of purl stitches. I found that placing a stitch marker between each of these sets of purls (so, between the two purl stitches) worked best. This way I knew where each section began and after a while, I could look at what was next and know what I needed to do without having to look at the pattern.
If you can count rows in your work and don’t want to use a row counter or tick sheet, it’s also handy to put a stitch marker on the front of your work in a flat column of stockinette stitch in the row where you have done a cable, then you can count and keep track of when you have reached a cable row again.
Understanding How Brackets Work
I have no idea what it actually makes and it’s only for the purpose of explaining how brackets work, as I can’t share the actual pattern here due to copyright. Use the process described below and apply it to the relevant section of the scarf pattern.
*k1 (p4, (k6, p8) twice, k9) twice, p8; rep from * once more, (k8, p1) twice.
With brackets in knitting, in cases like this, you follow from left to right, working the repeats as you come to them. Imagine it like rooms, you have to clear each ‘inner’ room before you can go through the other side. So you enter the red brackets, but once you see the green, you have to complete THOSE as many times as indicated before moving on to complete the red.
Using the above example, it goes like this:
Step 1: k1 (the stitches before the red bracket begins)
Step 2: p4 (the stitches at the start inside the red bracket, before the green bracket)
Step 3: k6, p8, k6, p8 (twice what is inside the green brackets)
Step 4: k9 (the stitches at the end inside the red bracket, which you can do now that you have completed the green brackets twice)
Step 5: Repeat steps 2-4 once more (to complete the two times doing everything within the red brackets, which includes the instructions for the green brackets each time).
Step 6: p8 (stitches after brackets
Step 7: Repeat steps 1-6 once more (indicated by the * marks to go back to the first star and do everything from that point one more time)
Step 8: k8, p1, k8, p1 (twice the stitches in the brackets at the end of the row)
Here’s another visual to help you understand the order of things, using the example above again.
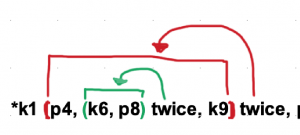
Where most people get confused is knowing what the repeat amounts apply to in each case. These repeat amounts always apply to the brackets they come directly after. So, in this example, the “twice” after the green bracket applies ONLY to the stitches inside the green brackets, which you complete before moving on to finish the rest of the stitches (k9) in the red bracket section. The “twice” after the red brackets applies to the whole of the red bracket section, which includes the green brackets, so when you see that you go back to the start of the red brackets, working the green bracket repeats when you reach them again.
Hopefully this helps take a little of the confusion out of brackets in knitting. Read through it a few times and see if it starts to make sense. You can also colour the brackets in your pattern and follow the steps (using the stitches and repeat amounts given in the real pattern, not my fake pattern above) to make it easier to follow the process.
Getting Comfy with Cables!
Cables, like many things in crafting, look much more difficult than they are. As a new knitter, you look at them and think “What in the what?! How do you make stitches go in another direction? How is that one going over the other one? What sort of sorcery is this?!”.
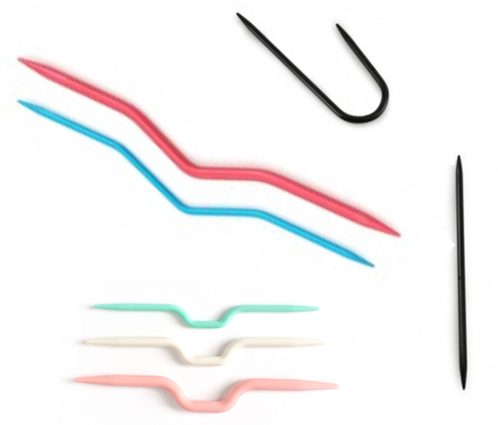
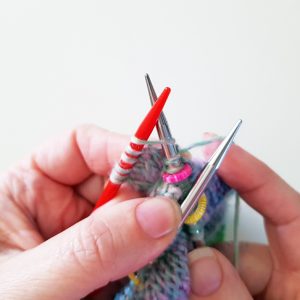
Well, it’s very simple! First, you need a cable needle. There are many different types out there, and you can see a few above, but which one is best is purely down to personal preference. You can also just use a double-pointed needle, as I do when I can’t find my proper cable needles. You just need something that you can slide stitches onto, hold them for a minute, and then knit from when you are ready.
If you want to see some really lovely cable needles, check out this new blog post from Scheepjes’ Creative Director, Simy Somer, where she shares some of her new favourites!
I highly recommend making use of lifelines in your scarf, especially if you are new to cables. Lifelines come by their name honestly as they are the best safety net a knitter can have. You can see a photo tutorial here on my Read Between the Lines Tips & Tricks post, which shows how to add them to your work. Trust me, it’s better to have them and not need them, than to need them and not have them!
I suggest putting a lifeline in the last right side row before your cable rows, rather than the wrong side row right before. This way you have a lifeline just before your cable but not in the actual row you are working the cables into.
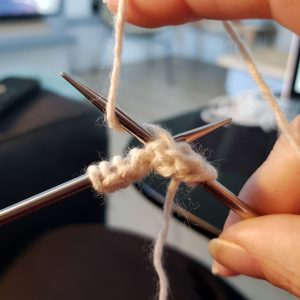
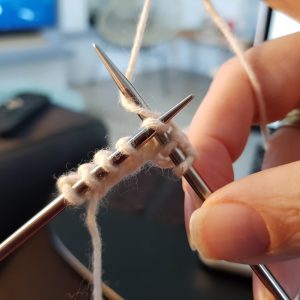
There are only two different types of cables in this pattern, but in reality, they are the same thing. The action is the same, the only difference is the stitches you are making and which column is crossing over which. Here is all you need to know…
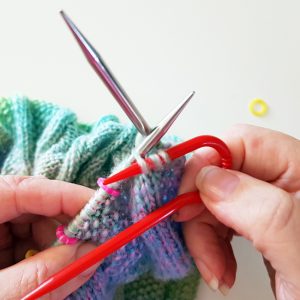
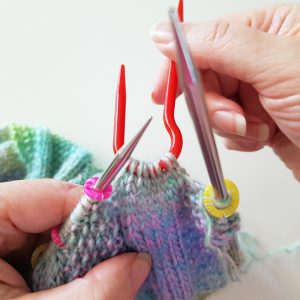
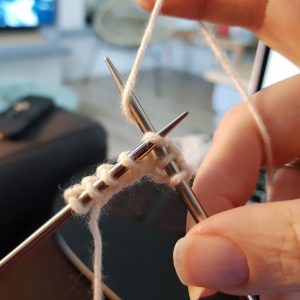
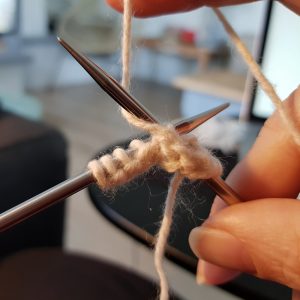
STEP 1: When you reach the cable in your pattern, slip the stitches specified in the description for that cable onto your cable needle. Make sure they are secure in the middle of your needle and not near the end where the stitches can slip off and then drop it behind your work (away from you).
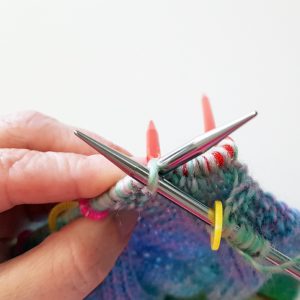
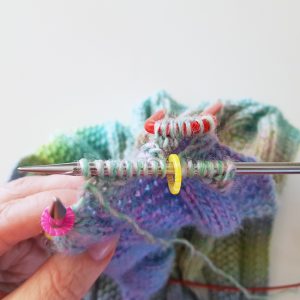
STEP 2: Pretend the stitches on the cable needle don’t exist, leaving them in the back, and start the next stitches on your left needle as explained in the cable description.
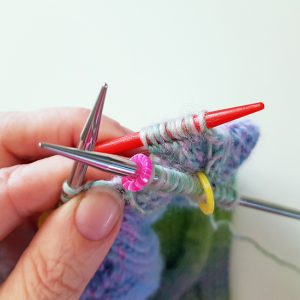
STEP 3: Being careful not to twist your work, pick up your cable needle from the back and work them as explained in the cable description, just as if the cable needle was your left needle. This can feel a little fiddly and tight in the beginning, just take your time and don’t work too closely to the tips of your needles (you can read more about why it’s important to not knit too close to the tips further down in the post).
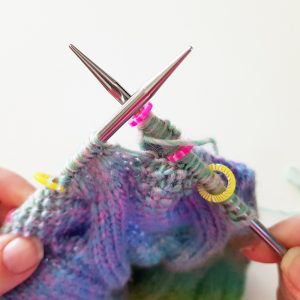
STEP 4: Congratulate yourself, you just made a cable! Well done! Now continue on with the stitches on your left needle and do it again a bunch more times when the pattern tells you to! 😁
Yeah, seriously, that’s it, that’s all there is to it! You just repeat that each time you come to a cable in the pattern and you know all you need to know. I told you it was easier than you think! Just be mindful to pay attention to which cable it is so you know to knit or purl the stitches accordingly.
Cable Concerns – Don’t Sweat the Small Stuff!
There are a few things you may notice while working on your scarf, that fall firmly into the “you are looking too closely” category. Things that you notice while knitting with it right under your nose, but aren’t really a thing in the bigger picture. I figured I’d get those out of the way now as I’m sure you’ll be asking, I know the way the crafter’s brain works! 😉
The main things that may catch your eye are yarn floats and holes. They are both normal, they aren’t a big issue, and in the case of this scarf, they may even help!
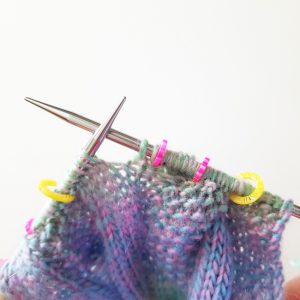
Yarn Floats or Ladders
I call these yarn floats because it’s the name that comes to mind, maybe there is another name for it, but that’s neither here nor there. I’m talking about the lines on the side of your cables, where it may look like you have something similar to what we’d call a ‘ladder’ in sock knitting.
Basically, where there is a long line of yarn between your stitches at the side of the cable. This shouldn’t be massively long, but having some of this is completely normal. It can even help with preventing your cables from pulling in too much, as it gives you that little bit of wiggle room. If you pull your stitches too tightly at the start and end of your cable sections, you may risk not giving your cables the flexibility to spread out which brings you back to cable noodles. Work naturally, even a little loosely (which is how the floats happen) but just not too tightly, and you’ll be fine.
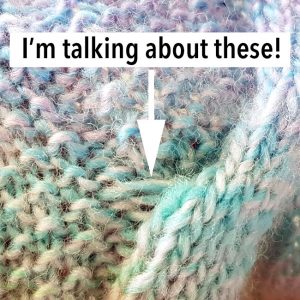
What’s With the Hole?!
Depending on the angle you look at your scarf, you may see a hole through the side of your cable. This is normal. You are crossing one piece over the other and with a somewhat wide cable, it’s natural to have a gap behind there. You can drive yourself into a crafter craze, twisting and turning it and staring at the hole, but try to let it go and continue knitting, as it isn’t an issue in the bigger picture.
So that’s it, that’s really all I can tell you about the cable in this pattern. If you get stuck somehow or have questions, you can always pop by the Scheepjes Facebook group and ask, we’ll be happy to help you sort it out!
Keep reading further down for more beginner tips!
Remember Those Whirl(igig) Versions I Mentioned?
Before I get to the rest of the tips, I have to show you these two scarves!
Do you remember in my announcement post when I mentioned that scarves were being made using Scheepjes Whirl and Whirligig? WELL, I’ve received some photos and info and let me tell you, they are fab! I know you won’t just take my word for it, so here are some photos.
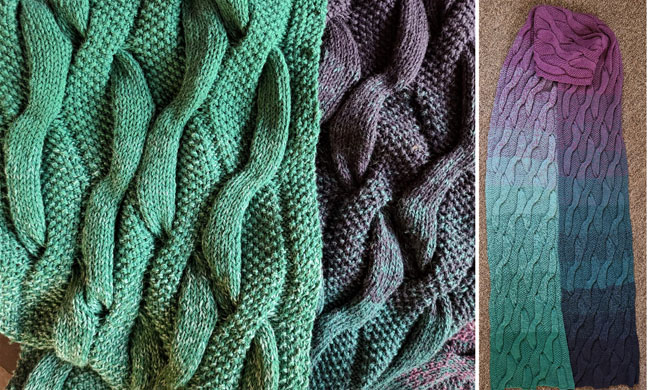 Scheepjes Woolly Whirl – Sugar Sizzle (472)
This beautiful (Woolly) Whirl version was knitted by Theresa Pearson, Scheepjes group admin extraordinaire! She knows just as well as I do that one of the first questions we get for any project is “Can it be made with Whirl?!” and she was a step ahead of us all! The answer is “HECK YEAH, IT CAN!”.
The Whirl Info
Theresa started with a gauge of 28 sts x 43 rows = 10x10cm using 3.5mm, which was pretty close to the original gauge in the pattern. She felt that this was too loose and decided to drop down to a 3mm needle as we thought perhaps the Woolly Whirl was slightly thinner than the Our Tribe, making the tension a bit too lose for that particular yarn (this was not actually the case, so please keep reading). Her finished scarf has a blocked size of 24cm x 220cm with 14 full pattern repeats and 10 of the 12 final rows. This used up her entire 209g cake of Woolly Whirl, with very little to spare.
In hindsight, Theresa felt that while the scarf is still lovely, she probably should have stayed with the 3.5mm and the recommended gauge as the 3mm ended up actually being a little too tight for this particular design in the end.
Based on her results, Theresa agrees that it’s best to start with a 3.5mm needle and take it from there to find the needle that gets you as close as you can to the gauge given in the original pattern. With Whirl, as was the case with Our Tribe, it’s better to keep the tension looser, to the recommended tension, even if it feels a bit too loose in the start. With this in mind, you should be able to complete the scarf with a single cake of Whirl!
 Scheepjes Whirligig – Grey to Lavender (201) and Whirligigette Grey (253)
This gorgeously smooshy Whirligig / Whirligigette version was knitted by Ruth Lambert, another fabulous member of our group moderation team. She loves taking Whirl projects and upping the squish factor by making them in Whirligig, so when I asked about a Whirl version she was front and center to test it out in Whirligig as well! I knew before she even started that it was going to be amazing.
The Whirligig / Whirligigette Info
As this yarn is a fair bit thicker than both Our Tribe and Whirl, gauge on this one was a guessing game. With a gauge of 20 stitches and 38 rows = 10x10cm using 4.5mm, Ruth used one entire cake of Whirligig plus 21g of a Whirligigette for 11 pattern repeats. The unblocked measurement was 200 cm long and 23 cm wide with a finished, blocked scarf of 27 cm x 210 cm.
Based on this info I’d suggest following Ruth’s lead. While you may still get by with the one Whirligig cake, it wouldn’t hurt to have a matching Whirligigette on hand to continue your scarf if you feel you would like a little extra length.
Additional Knitting Tips for Beginners
I know many of you out there are quite new with knitting, so I thought I’d mention a few things I’ve seen popping up in the Scheepjes Facebook groups recently. If you are a new knitter and are struggling to get your groove, there are a few things you can consider to see if it helps.
Changing Needles
If you have always tried to learn to knit with straight needles but find them a little too unwieldy, try switching to circular needles. They aren’t just for sleeves and socks anymore! Many knitters nowadays knit everything on circular needles, whether they are knitting flat or in the round. They can be much more comfortable in the hand and are very handy for on the go!
Consider Your Knitting Method
There are many knitting methods out there… English, Continental, Portuguese, Russian and many variations that people have formed themselves and passed down. How you learn to knit, at least in the past, has largely depended on where you lived and who was teaching you. Many of us learned from our mothers and grandmothers and we grew up assuming that their way was the only way, but that’s not true, there are loads! Thanks to the internet and YouTube, it’s possible to see them all!
I’m not going to go into how they all differ, but I did want to mention one thing for the crocheters who are learning to knit. If you have been trying to learn to knit but are struggling with it, have a look at the continental knitting method. Crafters with a lot of experience in crochet often find it much easier to pick up knitting with this method, especially when paired with circular needles. The motions are much more similar to the ones you are used to in crochet and should feel a little more natural than other methods you may have tried in the past. So, if you have a long history with crochet and are new to knitting – circular needles and continental method… try it and see if it helps! There are many, many, maaaaany tutorials on YouTube, so just give it a wee search and you’ll be good to go!
Stay Off the Tips
Stitches too tight to move on your needles, a constant fear of dropped stitches, or having them actually drop off… sound familiar? Knitting too close to the tips of the needles is a very common mistake made by new knitters and thankfully it’s just as easy to fix!
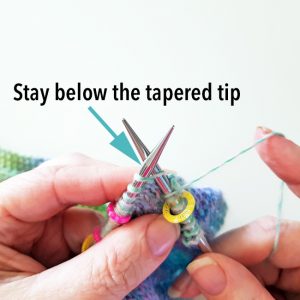
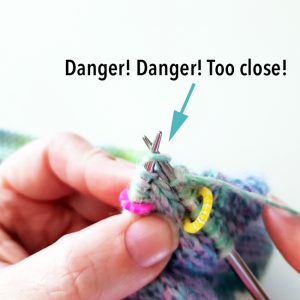
When knitting, you should always try to work with your stitches where the needles are at their fullest width, beyond the tapered tips, as you can see in the photo on the left. The instinct of many newer knitters is to knit closer to the tips, like in the right photo, because it feels easier, but it’s actually working against you in a couple of ways.
- When you work on the tapered tips of your needles, the width of the needle is smaller, which causes you to create smaller stitches that can’t comfortably move onto your needles as you continue knitting. This causes further issues when you come back to them in the following rows or rounds and need to work into them, especially if you are doing something like increase or decrease stitches, and you’ll find yourself fighting to get your needle into your stitch.
- Knitting on the tips of your needles doesn’t only create tight stitches, but very inconsistently sized stitches as well. If you look at your knitting and feel like the stitches are all different sizes, and look a bit messy, this may be the reason. Knitting on the main shaft of your needles, where the size is consistent, will help to create more even stitches, resulting in a more tidy and even tension.
- The fear of dropped stitches is real when you are working on the very tips of your needles. You may even have regular issues with losing stitches. Not only that, but this feeling of fear will cause you to be tense, which makes you work more tightly, which circles back to the previous issue. Working further down on your needles gives you better control and allows you to knit without feeling like it’s an extreme sport.
If you have been knitting on the tips of your needles this whole time and recognize some of these issues, try knitting further down on your needles. It’s going to feel VERY weird in the beginning but if you make a point on concentrating on that change long enough for it to become muscle memory, it will feel more natural to you and will really help you relax and enjoy your knitting more.
Don’t Twist Your Stitches
While twisted stitches can be a beautiful feature in a pattern, they are something you really only want in your work if they are intended to be there. Many new knitters (and even more experienced ones, I’ve learned!) are twisting their stitches without realising it. How can you tell if your stitches are twisted? The easiest way to tell is by looking at your knitting in stockinette (in flat knitting, this is done by knitting on one side and purling on the other, in the round you knit every round).
I have knitted a quick swatch with some Stone Washed XL (853) to help you see what to look out for. The photos aren’t really true to colour so please don’t use them as a reference.
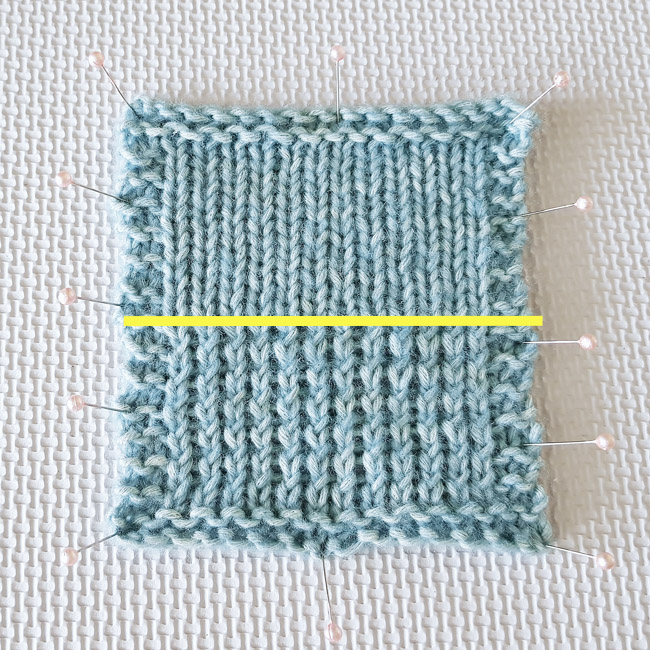
When you look at your stitches in stockinette, they should make a wave as they go through the row, but shouldn’t cross over each other. Your work should create even columns of V-shaped stitches, as you see in the top portion of the photo, above the yellow line. This is how stockinette stitch should look if you are creating your knit and purl stitches properly.
You can see the difference in the look of stockinette stitch when you introduce twisted stitches, shown below the yellow line. In that section I twisted my purl stitches, so you’ll notice that every second row of stitches is twisted, with the right leg crossing over the top of the left leg. You can also see that the stitches are very uneven, some are smaller and tighter than others, and it is generally more untidy than the work above.
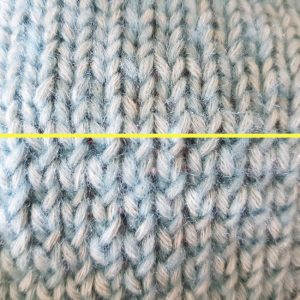
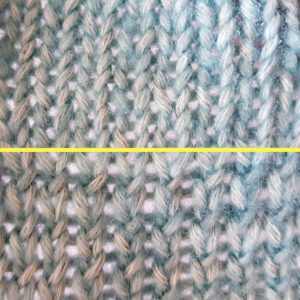
You can notice this more clearly when you look at the stitches closely, especially if you spread them out as I have in the photo on the right. When spread out, your stockinette should open into tidy columns of even stitches as seen on the top of the right photo, compared to the bottom, where the spacing is uneven and the twisted stitches are much smaller, which looks quite messy.
The most common causes for unintentionally twisting stitches are knitting or purling through the wrong leg of your stitch, or not wrapping your yarn consistently in the same direction.
I am going to use my own knitting method(English) to show how I work through my stitches and wrap my yarn. To not reinvent the wheel, I will recycle some photos I used to help someone else who was having this issue a while back, so excuse the laptop and TV in the background! 🤣
Making Your Stitches
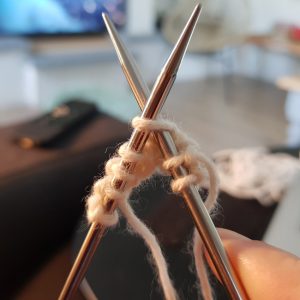
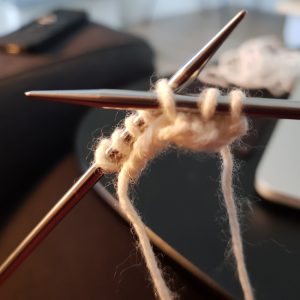
The photos above show put my needle into my my stitches when making my knits and purls.
Knit (left photo) – Right needle through front leg of stitch on left needle, from front to back (or left to right).
Purl (right photo) – Right needle through front leg of stitch on left needle, from back to front (or right to left)
Now, ASSUMING you go into your stitches in this same way when starting to make knit and purl stitches, you should be wrapping your yarn counter-clockwise around your right needle to complete both the stitches as in the photos above. Again, with the knit stitch on the left and the purl stitch on the right. The key to keeping your stitches untwisted is to wrap consistently in the same direction.
Have a look at the photos below which show a clockwise wrap for comparison.
Again you can see the knit stitch on the left, and purl stitch on the right.
- If you put your needle through your knit and purl stitches in the same way as I do, and wrap one clockwise rather than counter-clockwise, this is where your twisted stitch is coming from.
- If you wrap your yarn counter-clockwise for both stitches, as I do, but work through the back leg of your stitch or through the stitch in another direction when either knitting or purling, this will create a twisted stitch.
There are other ways that twisted stitches can happen, but those are the most common. As I mentioned earlier, it will vary from one method to the next, and process of elimination is the only way to get to the root of the issue, but this is at least a good starting point to help you figure it out!
Ok, my knitting friends, that is all the info I have for you at this point and it should get you well on your way to breezing your way through your Twisted Roots Scarf! For now, concentrate on getting started, getting the hang of the cables and making sure your stitches are constructed properly, and we can deal with other things (like blocking!) a little later in the MAL! Have fun!
This post contains affiliate links. If you purchase your yarn or other materials via the links in this post, I will receive a small percentage of the sale! This is no extra cost to you but is a big help to me as a designer. Thank you for your support!
When ordering your Yarn Bookazine, be sure to check the language as it is available in both Dutch and English.
UK and International: Woolwarehouse, Deramores, Black Sheep Wools.
Benelux: Caro’s Atelier
Bookazine subscriptions are also available: English | Dutch
You can also ask your preferred Scheepjes retailer or find a shop near you!
Well I got yarn, pointy things and pattern oh and cable thingies I .. off I go 🤣🤣🤣 … I am the adventurous beginner 😁
Followed on Instagram and liked the Facebook page. Thanks for the MAL!
This will be gorgeous to started 2021 knitting this beauty 😍🍀
I’m new to this Instagram thingy, so not sure if I’m commenting in the right place. But I would really love to win this prize, it looks fab. Pick me! Pick me! (Please).
Yesssss start today!
Thank you very much Tammy.
So beautiful to make and in group knitting isn’t lonesome anymore :)
Dankjewel Tammy!
Ben erop uit om zo snel mogelijk te beginnen:)
Zo mooi.
Ik hoop dat het me gaat lukken maar met jullie hulp zal dat wel.