
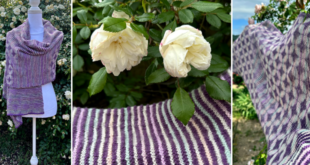
The finishing touches are on my I Love Herringbone Wanderlust project, and not only is it finished, but it actually has a proper name – All Good Things!
Why did I decide to call it All Good Things? Well, probably for the very reason you just came up with in your head. All good things come to those who wait. I have to give my friend Nerissa credit for helping out with the name as I was well and truly stumped. When she said “All Good Things”, I knew right away that it was the right one for this project.
The name is so suitable at the moment for so many reasons. It’s been a bit of a theme in my life lately (ok, for ages), which you can tell from reading recent posts about what’s been going on with us and our move, there’s a lot of hurry up and wait going on over here, but thankfully it has all been worth it as we’re in a truly happy place now. It’s also a really suitable name for this project as the design is made using two stitches that are not for the impatient knitter, but they are both gorgeous and totally worth the effort.
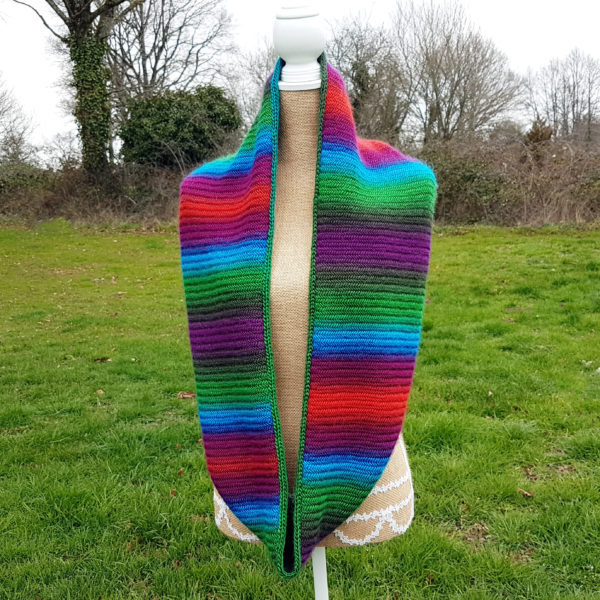
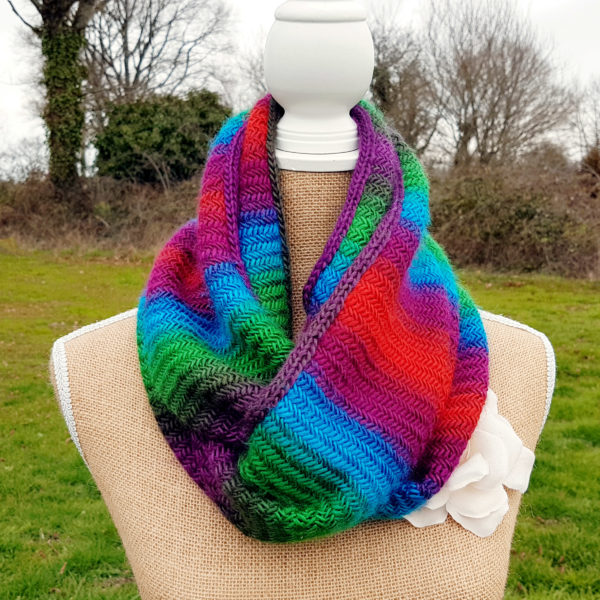
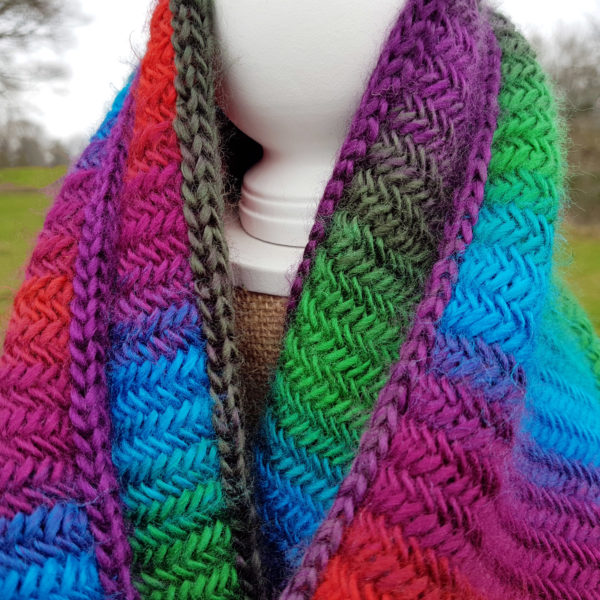
I used the herringbone stitch for the body and an applied icord for the edge. I had to come up with a work as you go process for the edge, which I will make a tutorial for, but it really worked out great. When I say they aren’t for the impatient knitter, I just mean that these are stitches that require you to work a number of motions to create one stitch, so it doesn’t go as quickly as say, stockinette, for example. They are, however, for a knitter who really likes to watch a lovely stitch pattern reveal itself. I’m so, so that kind of knitter and I’m still completely enthralled with this stitch.
The few extra steps certainly does pay off in the end because this is beautiful, don’t you think?!
Good things do, indeed, come to those who wait, or rather, those knitters who can appreciate that sometimes it takes a few extra steps to come up with something really wonderful.
This isn’t a difficult project, it’s actually incredibly easy once you get going, which is even better because I think the herringbone always looked difficult when I saw photos of it. It turned out to be much easier than I expected and before I was ten rows in I could easily knit along with the flow without having to look at the pattern.
This yarn also suits herringbone perfectly, I think. I’m totally mad about these colours! Most herringbone examples I saw were done using a single colour and were quite subtle (and beautiful!) but I was feeling all GO BIG OR GO HOME about this whole thing and the Rio de Janeiro colourway was perfect.
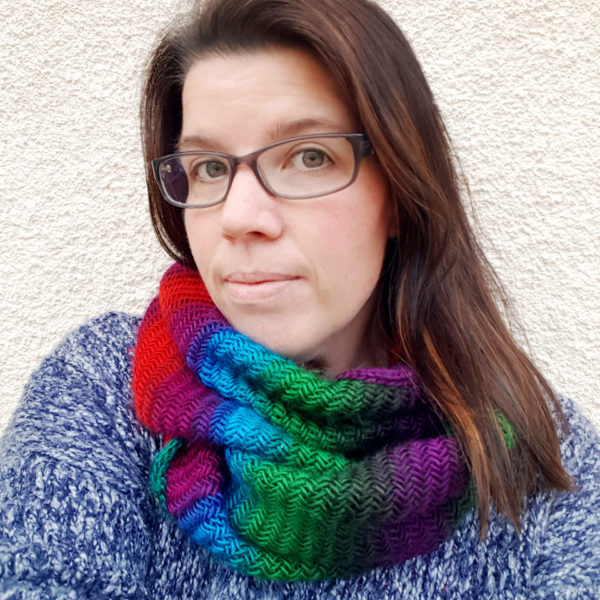
There you go, since I know one of your first questions are always “Can I see it on a person?!”. While I don’t love having photos of myself, I do love this cowl. I was surprised by how a yarn that is so soft anyway can become even softer after blocking. I know people say that there’s no point in blocking acrylic but to that I say “POPPYCOCK!” because this yarn really responded beautifully to it, both in the shaping and the softness. Plus, if you’ve ever used Eucalan you are probably like me and are in it for the smell anyway. I live for the jasmine smell from their Wrapture wash.
Anyway, as I said, it’s all done now! Well, the fun bits, which is the actual making of the thing. Now begins the part where I always falter, writing the pattern, doing the tutorials and actually releasing the pattern (yes, yes, I know I still haven’t released the hat pattern I posted about months ago, but I will!). First, I will finish this one while it’s still fresh in my mind and get it out for you all as quickly as I can. I think I may bite the bullet and do a video, as this stitch and the attachment of the edge are much easier to demonstrate in a video than in photos. I’ll try to get over how much I hate the sound of my own voice!
So, I will leave you with that one last photo and get back to work! I will (I mean it this time!) be back soon with the pattern! Remember, all good things come to those who wait!
2 or 3 balls of Scheepjes Wanderlust in the colour of your choice (I used Rio De Janeiro 453) for mine.
6mm and 4mm needles
Note: I said 2 or 3 balls because I went into a third when making my cowl. I decided once I finished knitting the body that I wanted to add the edge. I used exactly 200g for the body and 16g for the edge. If you want to make your cowl slightly shorter (with an edge) or leave out the edge, you could get by with 2 balls. On the other hand, if you are also the type that likes to GO BIG OR GO HOME, go ahead and buy 3 balls, you could make it wider or longer as you will have plenty of yarn to spare. I will leave that up to you and explain how to adjust it when the pattern is released!
You can get your hands on Wanderlust internationally via WoolWarehouse* or your local Scheepjes retailer!
P.S. You may have noticed I have a new model, but lets keep that secret just between us, shall we? I don’t need Susan Lucci catching wind of someone stealing her gig. This model is on loan from our neighbour while they are on holiday in Spain for a few months. I call her Alexis Carrington. Susan Lucci will be joining me down here in France in a few months and I’ll have to make her something especially pretty to make up for having stuffed her in storage for almost a year!
*Affiliate Link
Hi Tammy, do you still plan to publish the pattern for this? I hadn’t spotted it yet and would love to give it a go!
Hi Gemma! I do :) I had some stuff going on that distracted me and then it was summer, so I let it slide, figuring it was best to wait until fall. So, I will be digging it out to write it up soon. :)
Wonderful, thank you – can’t wait! Now just need to decide on a colourway. Debating Chicago :-)
Hi Tammy,
Are you still willing to publish the pattern for the scarf. I really want to make one myself.
Hi Vera, so sorry for such a long wait. I had planned to release it earlier in December but got behind and then was on holiday in Canada for a month. I’m working on it now and promise to have it ready shortly! :)
I can´t understand how beautiful this scarf is. I made one with the same yarn but different pattern, and I don´t like the outcome of it. There is so much dark green in my work. so Little bright Colors and in your work there is so much brightness….. I don´t understand that. But i like your work very much!
Hi Christiane, sorry to hear you aren’t happy with the colours in your scarf. Did you use the same colourway as well? Do you have photos?
The stitch is so beautiful and a super combination with the yarn! So far I’ve laid my eye on Reykjavik for this one…
X, Judith
Oh, I’d love to see that! :)