
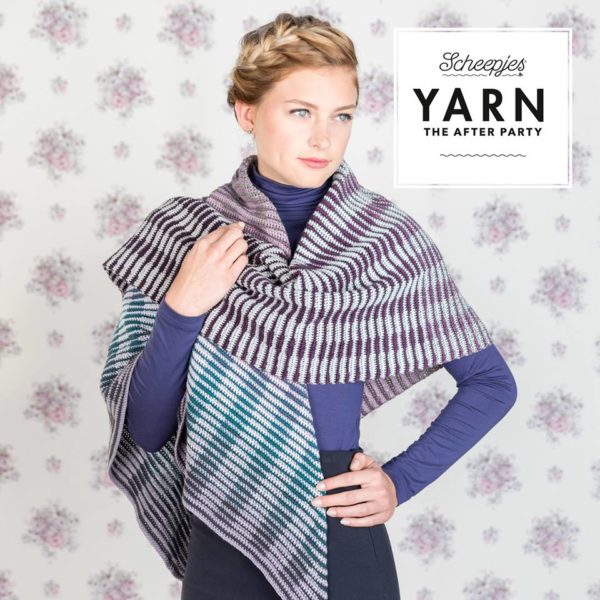
 (Watermelon Hell Raiser and Minty Black Velvet)
Welcome to the RBTL + CBTL Make-Along! If you are here, it means you’ve decided to join us and make the Crochet Between the Lines shawl, the new crochet version of my Read Between the Lines shawl! Due to the enthusiasm about these patterns, many people have already started working on them, but that’s ok because those of you who have waited will benefit from it as I have been gathering tips to share with you!
Welkom bij de RBTL + CBTL Make-Along! als je hier bent, betekent dat dat je meedoet met het maken van de Crochet Between the Lines shawl, de nieuwe gehaakte versie van mijn Read Between the Lines shawl! De patronen zijn ontzettend populair en daarom zijn meerdere mensen al gestart met het maken van de shawls. Maar dat geeft niet, want als je gewacht hebt kan je nu profiteren van alle tips die ik daardoor heb verzameld en opgeschreven!
Video Credit: Niamh from Woolly Yarn Chicken
CBTL (Front) Green Tea Tipple worked from the inside and Lavenderlicious from the outside
RBTL (back) Blueberry Bam Bam and Caramel Core Blimey both worked from the outside
The above video was made by one of my lovely testers for the members of the MAL to see the two shawls together. Aren’t they wonderful? You can read more about the comparison of each of the shawls, how they work up and what their differences are here on my release post.
De video hierboven is gemaakt door een van mijn testers van de MAL, om beide shawls te vergelijken. Zijn ze niet prachtig? Je kan meer over deze vergelijking van shawls en hoe ze voelen hier lezen in mijn release post.
Ok, let’s jump right in! Ok, tijd om te beginnen!
Making-Along!
A make-along is an informal gathering of crafters working together on the same project. This shawl, together with its sister shawl Read Between the Lines is a part of a Scheepjes MAL starting TODAY! Here is all the info you need for joining in our MAL and how and where to best share your creations.
Een make-along is een informele groep van makers die samen aan hetzelfde project werken. De shawl, samen met haar zustershawl Read Between the Lines is de Scheepjes MAL die vandaag begint! Hier is alle informatie die je nodig hebt om mee te doen en hoe je het beste je voortgang kan delen.
 ( Lavenderlicious and Blackcurrant Squeeze Me, both from the middle)
Facebook Groups (Facebook groepen)
The make-along is being held in the official Scheepjes groups on Facebook. Any announcements and support will take place only in these groups, where the other admins, my testers, and I will be on hand to answer any questions. If you would like to share your projects, take part in the fun and be the first to know any info that comes up regarding the patterns and MAL, please join the group that suits you most:
De Make-Along wordt ondersteund via de Facebook groepen van Scheepjes. Daar vind je alle officiele aankondigingen en ondersteuning terug die mijn mede-admins en ik je kunnen geven. Als je je projecten wil delen, dan is de Facebook groep daar de perfecte plek voor. Er zijn twee groepen, een internationale groep en een Nederlandse groep:
Scheepjes Official International Group (English)
Scheepjes Officiële Nederlandse Groep (Dutch)
Social Media
For the best exposure for your beautiful shawl, be sure to use any of the following social media tags!
Gebruik deze hashtags om zeker te weten dat ik, en anderen jouw shawl op social media kunnen terugvinden:
#CBTL #BetweentheLinesMAL #ScheepjesMAL #CrochetBetweentheLinesShawl #CanadutchMAL @Canadutch
Tag me on Instagram and Facebook to be sure I don’t miss your wonderful creations! Also, don’t forget to share your project on Ravelry!
Tag me op Instagram and Facebook om zeker te weten dat ik je prachtige shawl niet mis! Vergeet ook niet je project op Ravelry te delen!
Starting and Finishing Your Shawl (Starten en eindigen van je shawl)
Getting started can often be the most difficult part. Here are the things to consider when starting your CBTL. Starten kan soms een uitdaging zijn. Hier zijn wat punten om te overwegen bij het starten en eindigen van je CBTL.
Colour Choice (Kleurkeuze)
When I first released the original pattern I thought there were wrong ways to choose your colours. Since then I’ve seen so many shawls being made and there simply is not a bad combination. Somehow, no matter what you choose, it works. It just WORKS. So please don’t spend a lot of time stressing over the colours. Choose two cakes of Whirl you really love and throw caution to the wind! As long as you love the cakes, it’s all good.
Toen het eerste patroon werd uitgegeven, dacht ik dat er een verkeerde manier kon zijn om kleuren te selecteren. Sindsdien heb ik zo veel voorbeelden van sjaals gezien en nu weet ik dat er simpelweg geen verkeerde combinatie bestaat. Wat voor manier je ook gebruikt: het werkt. Het WERKT gewoon. Maak je daarom geen zorgen over de kleurcombinaties. Kies twee Whirl garencakes waar je helemaal gek op bent en negeer goedbedoelde waarschuwingen. Zolang jij de cake mooi vindt, komt alles goed.
The CBTL can be made with any combination of Scheepjes Whirl, Woolly Whirl or Frosted Whirl
De CBTL kunnen worden gemaakt met alle combinaties van of Scheepjes Whirl, Woolly Whirl or Frosted Whirl
 Photo Credit: Allison Allen (Facebook)
(Jumpin’ Jaffa Pop in opposite directions)
I’ve been asked a lot about using the same colour in two directions. Yes, this is possible. The only thing to be aware of is that you will have the same colour meeting in the middle of the shawl. This isn’t necessarily an issue and can create an interesting mirrored effect with the illusion moving into and out of the shawl. You can see this in the above photo of a completed Crochet Between the Lines.
Ik heb al vaak de vraag gehad of je dezelfde kleur in twee verschillende richtingen kan gebruiken. Ja, dat is mogelijk. Het enige waar je op moet letten is dat je dezelfde kleur in het midden van de shawl hebt. Dit is niet per sé een probleem en kan een heel mooi gespiegeld effect geven, waarbij je illusie over de shawl glijdt. Je kan dit in de foto van deze voltooide Crochet Between the Lines hierboven zien.
Gauge Swatch and Hook Size (Draadspanning en naaldgrootte)
Let op: Het proeflapje voor dit patroon is gemaakt in 10x10cm vasten, en niet in de patroonsteek!
Do not choose your hook size based on how you want your crocheted fabric to feel. Going up in hook size to create softness or drape could cause large gaps between your stitches after blocking. The CBTL requires compact stitches for the illusion to show properly, therefore, it is very important that you do a gauge swatch to ensure that your shawl will work out with the desired stitch definition and drape. If your shawl feels slightly stiffer than you would like while making it, this is entirely normal. The drape, fluidity and size will come with blocking. Do a gauge swatch to determine what hook is needed to meet gauge and trust the pattern. See my blocking section for before and after photos.
Kies niet je naaldgrootte gebaseerd op hoe je je shawl wil laten voelen. Als je wat grotere haaknaalden kiest dan maak je een zachte shawl die soepel valt, maar kun je ook wat grotere gaten tussen de steken na het blocken zien. De CBTL illusie heeft compacte steken nodig om het mooist uit te laten komen. Daarom is het echt belangrijk dat je een proeflapje maakt om zeker te weten dat je de shawl lekker aan vind voelen. Als je shawl wat stijver voelt dan dat je zou willen, maak je geen zorgen, dat is normaal. Met blocken wordt de shawl ook soepeler, zachter en groter. Doe dus een proeflapje om te zien welke haaknaald jij nodig hebt om de juiste afmetingen te maken en vertrouw op het patroon. Zie het kopje ‘blocken’ voor foto’s van de shawl voor, en na blocken.
Yarn Direction (Garenrichting)
If you aren’t sure which ends to start with, meaning which colours you want at the beginning or end of your shawl. One thing to consider is that you may have yarn left over in the end. The rows become very long, which means you may have a few grams left after not being able to finish a full row.
Als je niet zeker weet met welk uiteinde je wil beginnen (oftewel welke kleuren je aan het begin en einde van je shawl wil) is het belangrijk om je te realiseren dat je misschien wat garen over hebt aan het einde. De rijen worden naarmate de shawl vordert langer, wat betekent dat je de laatste rij misschien niet helemaal kan afmaken en je dus een paar gram over hebt.
 Photo Credit: Marielle de Vries
(Turkish Delight worked from the inside, Brambleberry from the outside)
If you have a colour you really love, start with that one, as this will ensure that you are able to use all of it in the shawl. The starting colours can be seen in the above photo in the pink part of the shawl over the shoulder, the finishing rows can be seen along the bottom edge in the dark purple.
Als je een kleur hebt die je echt prachtig vindt, start dan met die kleur zodat je zeker weet dat je hem volledig gebruikt. De startkleuren (de kleuren waarmee je opzet) kun je in de foto hierboven zien in het roze gedeelte van de shawl bij de schouder, de laatste paar rijen zie je langs de onderrand in het donkerpaars.
Preparing Your Yarn (Je garen voorbereiden)
If you choose to work one or both of your colours from the inside of the ball, you may find it easier to rewind the ball(s) so that the inside colour moves to the outside, to prevent any issues with tangling or ‘yarn barf’.
Als je van een bol besluit dat je vanuit het midden wil starten, wind dan je bol opnieuw op met een wolwinder zodat je binnenste draadje aan de buitenkant zit. Zo voorkom je eventuele problemen met knotten garen die uit het midden van je bol komen omdat je de bol van buitenaf kan starten.
The Beginning (Het beginnen)
Before you begin, be sure to double check and make sure you are following the pattern in the correct terms. The printed booklets are written in UK-dc which is US-sc. If you have purchased the pattern via Ravelry, please make sure you are following the correct pattern for the terms you are familiar with.
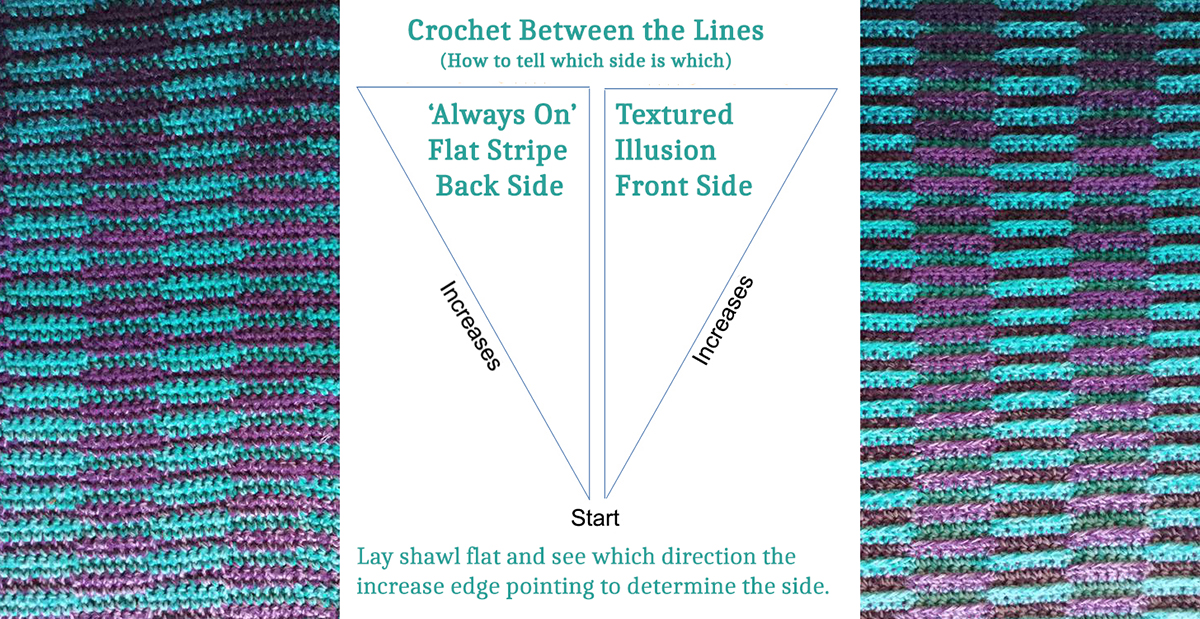
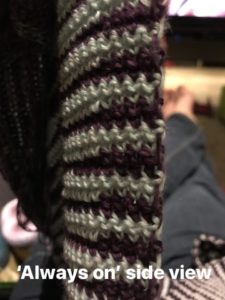
If you don’t notice the illusion stripes right away, don’t panic, as they become more visible as you get farther along in your work. This shawl is reversible, with a textured illusion side and an ‘always on’ flatter striped side. Be sure to be looking on the textured side if you are looking for the illusion effect.
Als je de illusie niet direct ziet, geen paniek. De illusie wordt steeds duidelijker naarmate je verder komt in je werk. De shaw is omkeerbaar, met een reliëfillusie en een wat plattere illusie aan de andere kant. Als je echt zoekt naar het illusie effect, kijk dan aan de reliëfkant.
 Shawl Photo Credit: Niamh from Woolly Yarn Chicken
(Green Tea Tipple and Lavenderlicious)
In the above photo, you can see how to determine which side of the shawl you are looking at. Click the photo for a larger version where you can see the stitches more clearly.
Please note: Left handed crocheters will create a mirror image of what is shown.
In de foto hierboven kan je zien hoe je bepaalt naar welke kant je kijkt. Klik op de foto voor een vergrote versie.
Let op: linkshandige crocheters creëren een spiegelbeeld van wat hierboven wordt getoond.
Blocking (Blocken)
A stern blocking is absolutely essential for the CBTL for two reasons… Firstly, the shawl wants to curl on the edge and blocking will go a long way to fix it if it does happen and also to block it to size. Unlike the knitted version, the CBTL does not work up as closely to the finished dimensions. You would be doing the CBTL an injustice by not doing so.
Een stevige blokbeurt is absoluut essentieel voor de CBTL om twee redenen… Allereerst omdat de shawl de neiging heeft om bij de rand te krullen en blokken helpt om dit recht te maken. Daarnaast helpt het ook om de juiste grootte te krijgen. Anders dan bij de gebreide versie, komt de CBTL niet echt overeen met de uiteindelijke afmetingen. Bij de CBTL is het zonde als je hem niet blockt.
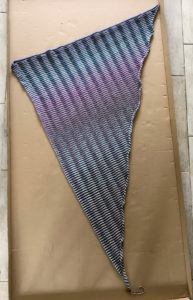
Photo Credits: Fiona Kelly & Scheejpes
( Lavenderlicious and Blackcurrant Squeeze Me, both from the middle)
If you look at the above photo of the shawl from the official photos, you can see the difference blocking makes in this pattern. You can see that the freshly crocheted shawl is very compact and the edge is rolling, which is the nature of the small and compact stitches. On the right, you see the exact same shawl in the official After Party photos. It has a beautiful drape, is much larger, the stitches are more spread out and the curling is no longer an issue. Don’t be afraid to firmly stretch your shawl when blocking as it is required to achieve the same results you see above.
Als je naar de bovenstaande foto kijkt kan je zien wat een verschil blocken maakt. De net gehaakte shawl oogt erg compact en de rand krult om. Niet gek, want dat is de aard van deze steek. Rechts zie je dezelfde shawl in de officiële After Party foto’s. Hij valt prachtig, is veel groter, de steken zijn gelijkmatiger en het krullen is niet langer een probleem. Wees niet bang om je shawl flink op te spannen wanneer je hem blockt, want dat is nodig om deze resultaten te bereiken.
Block with the illusion side facing up and remember to also stretch and pin along the increase edge, creating the triangle shape in the diagram below, as you will end up with a very long and skinny shawl otherwise.
Block met de illusiekant naar boven en vergeet niet dat je ook de kant met meerderingen vast moet pinnen om de driehoeksvorm te bereiken, anders krijg je een erg lange en dunne shawl.
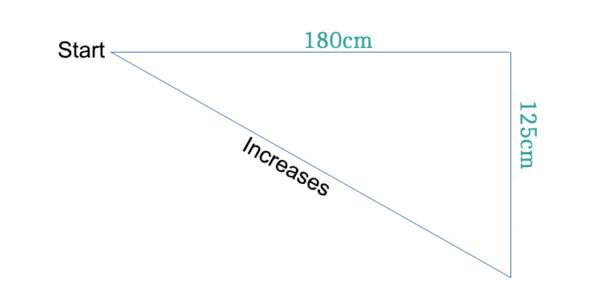
To give you an indication of the original size of the shawl and and how much it is stretched during blocking, the pre-blocked measurements were 109cm (width) and 160cm (length).
Om u een indicatie te geven van de originele maat van de shawl en hoeveel de shawl is uitgerekt tijdens het blocken, de metingen vóór het blocken waren 109cm (breedte) en 160cm (lengte).
If you are unfamiliar with blocking, see this great tutorial from Kirsten at Haak Maar Raak. This shawl should be wet or spray blocked, not steamed. It’s advised to use a colour catcher in your water when blocking and always use rust proof pins. The use of blocking wires also makes blocking this project much easier, as you don’t have to use a thousand pins. This also helps keep your edges tight and straight.
Als je niet bekend ben met blocken, bekijk dan deze tutorial van Kirsten van Haak maar Raak. Deze shawl kan je nat- of sprayblocken, maar zeker niet stoomblocken. Ik raad je aan om een kleurendoekje in je water te gebruiken als je blockt, en altijd roestvrijstalen pinnen te gebruiken. Voor het blocken kan je ook gebruik maken van blocking wires, zo hoef je geen bergen t-spelden te gebruiken! Ook block je je werk regelmatiger (strakker) op deze manier.
Pattern Tips (Patroontips)
Here are a few tips that people have found useful when working on their CBTL. The videos are in English but for those of you who don’t speak it, the visual should still help.
Hier zijn een paar tips die mensen handig vonden terwijl ze aan de CBTL werkten. De video’s zijn in het Engels maar kunnen alsnog handig zijn!
Changing Colour and Maintaining a Tidy Edge
(Kleuren wisselen en een nette rand maken)
Je neemt beide draden mee naar boven langs de hele sjaal. Je knipt je draad niet af en je hoeft het ook niet mee te nemen terwijl je haakt.
When the pattern tells you to change colours, you simply drop the colour you were working with and pick up the other. It helps to keep the yarn taut (not tight, to cause the fabric to buckle, but snug enough that it doesn’t have any slack). It also helps to keep the yarns in the same position when carrying them up. For example, always keep Yarn A or B to the front when carrying your yarn up, this will result in a neat, uniform edge.
Wanneer het patroon zegt dat je van kleur moet wisselen, gebruik je de kleur waarmee je bezig was niet en houd je deze aan de kant, je neemt de andere kleur en gaat verder. Het helpt om de draad wat strakker te houden, niet te veel dat je shawl gaat plooien, maar net genoeg dat het niet los hangt. Het helpt ook om je garen een eigen plek te geven wanneer je het meeneemt. Bijvoorbeeld, houd Kleur A aan de voorkant en B aan de achterkant, dit helpt om de zijkant gelijkmatig te houden.
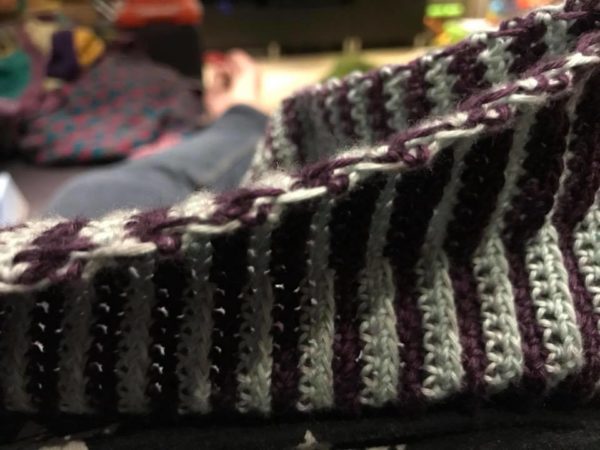

In the above photos, you can see a close up of Fiona’s edge from the After Party shawl, done exactly as I have described. This is the shawl you have all seen and loved in the official release photos, where you can see the edge is beautiful and not an issue at all.
In de foto’s hierboven kan je een close up van Fiona’s rand van de After party shawl zien, precies zoals ik het hierboven heb beschreven. Dit is de shawl die je allemaal hebt gezien en verliefd op bent geworden, en zoals je kan zien is de rand prachtig en helemaal geen struikelblok.
Above you can see a video that Fiona kindly made for our Facebook groups to show how to do the colour changes.
Hierboven kan je een video vinden die Fiona heeft gemaakt voor onze Facebook groepen om de kleurwisselingen te illustreren.
BFLdc Stitch (BVLv steek)
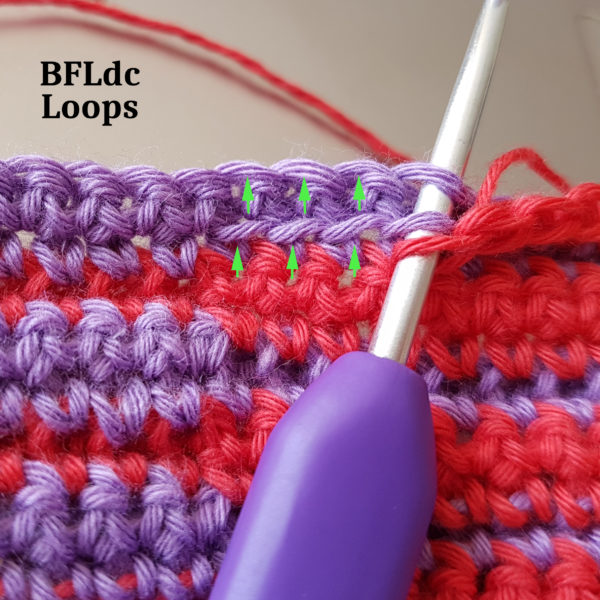
The question I’ve gotten the most is about the BFLdc stitch. Above you can see a photo showing which loops you use as well as a video demonstration.
De vraag die ik het meeste heb gekregen, gaat over de BVLv-steek. Hierboven zie je een foto die laat zien welke loops je gebruikt en een videodemonstratie.
Checking For Mistakes (Check op fouten)
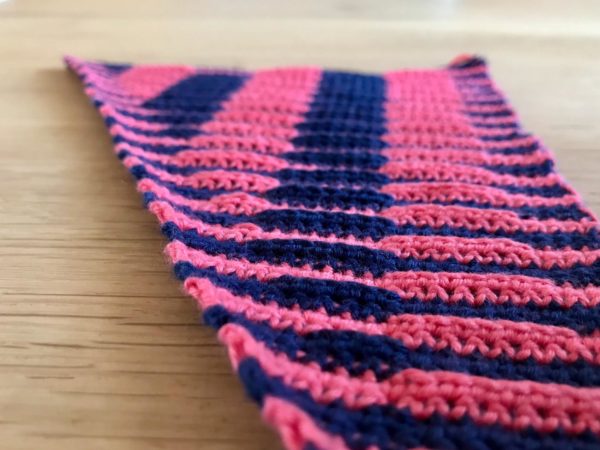 Photo Credit: Marian Huizing (Facebook)
(Blueberry Bam Bam worked from outside, Watermelon Hell Raiser from the inside)
The best way to check for mistakes in your work is to lay it on a flat surface, get down low and look at the illusion lines. If there is a mistake it will be more visible this way than trying to look at it from above. Do this. Do it often.
De beste manier om fouten te ontdekken is om regelmatig te checken. Leg je werk plat neer en kijk naar de illusie. Als er een fout is waar je de rechte en averechte stukken hebt omgedraaid dan zie je dat het beste op deze manier. Doe dit regelmatig!
Pattern & Materials (Patroon en materialen)
Before you can do any of the above, it helps to have the pattern and all of the materials you need. Here is the info on what you need to put together to take part in the MAL.
Voordat je aan de shawl kan beginnen, heb je natuurlijk het patroon en de materialen nodig. Hier is alle info die je nodig hebt om deel te nemen aan de MAL.
Purchasing the Pattern (Het patroon kopen)
The patterns are be available in UK English and Dutch as pretty coffee table booklets which contain a handy shade card in the center to help with your colour selection. Experience so far has shown this to be everyone’s most difficult part of the entire project, with so many amazing combinations available! The booklets are available via Scheepjes retailers. The CBTL pattern is also available on Ravelry in multiple languages as an instant PDF download!
De patronen zijn beschikbaar in (UK) Engels en in het Nederlands, met een handige kleurkaart in het midden om je met je kleurselectie te helpen. Kiezen is tot nu toe het lastigste onderdeel van het hele project, met zoveel ongelofelijke combinaties die mogelijk zijn. De boekjes zijn beschikbaar via Scheepjes winkels. Het CBTL patroon is ook in meerdere talen beschikbaar via Ravelry en is gemakkelijk te downloaden als PDF!
Yarn & Materials (Garen en materialen)
2 x Scheepjes Whirl Cakes
3mm Crochet Hook
Stitch Markers (Optional)
Darning Needle
2 x Scheepjes Whirl garencakes
3mm haaknaald
Stekenmarkeerders (optioneel)
Stopnaald
Both of these shawls can be made with any combination of Scheepjes Whirl, Woolly Whirl or Frosted Whirl!
Deze beide shawls kunnen worden gemaakt met alle combinaties van of Scheepjes Whirl, Woolly Whirl or Frosted Whirl!
UK and International buyers can find Whirl at Woolwarehouse, Black Sheep Wools and Deramores.
Canadian and International buyers have a great option with the CBTL kit from Knotty House.
Those of you in the Netherlands should have a look at Caro’s Atelier for a Make-Along kit! She also has these handy After Party storage boxes for your collection!
Kopers uit het Verenigd Koninkrijk of internationale kopers kunnen Whirl vinden bij Woolwarehouse, Black Sheep Wools en Deramores.
Canadese en internationale kopers hebben een geweldige mogelijkheid voor een CBTL kit bij Knotty House.
Als je in Nederland bent, kijk dan naar Caro’s Atelier voor een Make-Along kit! Zij heeft ook deze handy After Party opslagdozen voor je verzameling!
You can also find anything you need online or perhaps local to you via one of the many other Scheepjes retailers – Full list here.
Je kunt ook alles wat je zoekt online vinden, of misschien bij jouw in de buurt via een van de vele Scheepjes winkeliers – Een volledige lijst is hier te vinden.
Some stores are offering special gift boxed sets of Whirl & After Party booklets to accompany this MAL. The boxes are perfectly sized to fit two cakes of Whirl and the two After Party Booklets! These are not just a nice way to keep your project together, but it would also make a wonderful gift! Check with your favourite Scheepjes retailer for details and prices!
Sommige winkels bieden speciale cadeausets van Whirl & After Party booklets met deze MAL. De dozen zijn gemaakt voor precies twee Whirl garencakes en de twee After Party booklets. Op deze manier kun je niet alleen je project bijeenhouden, maar het is ook een prachtig cadeau. Kijk bij jouw favoriete Scheepjes-winkelier voor details en prijzen!
Affiliate Linking in This Post (Affiliate Links in deze post)
In this blog post, I am using affiliate links. What that means is they are links that, when you use them to visit a shop and make a purchase, a small portion of that purchase goes to me. It costs you nothing extra but is a really wonderful way for you to support me as the designer! The way it works is, you click the link from this page and go to the shop, it looks no different to you, works no differently, but the shop forward a small % of the cost of your full purchase to me! Pretty cool, right? It’s a wonderful program set up by some of the Scheepjes retailers which can really make a big difference for us as designers. So, if you do use the links in this post for your purchases – Thank you so much!
In deze blog, maak ik gebruik van affiliate links, of partnerlinks. Dit houdt in dat wanneer je deze gebruikt om een webwinkel te bezoeken en een aankoop doet, een kleine portie van die aankoop naar mij gaat. Het kost je niets extra’s, maar het is een geweldige manier waarmee je mij als ontwerper kunt ondersteunen! Het werkt als volgt: je klikt op de link van deze pagina en je wordt naar de pagina geleid. De website lijkt hetzelfde en werkt hetzelfde, maar de winkel stuurt een klein % van jouw aankoop naar mij! Cool, of niet? Het is een geweldig programma dat door Scheepjes winkeliers is opgezet en het kan een enorm verschil maken voor ons als ontwerpers. Dus, als je je aankopen via deze links doet voor je aankopen – Ontzettend bedankt!
Hej, in rij 29 begint men aan de tweede streep, maar ik krijg rij 29, 30, en 31 niet kloppend. er blijft een voor lus van een vaste op de voorkant zichtbaar. wat doe ik verkeerd. ben al meerdere malen overnieuw begonnen, maar kom steeds hetzelfde probleem tegen. voor mijn gevoel passen rij 30 en 31 niet bij elkaar.
Hi Tammy, what a beautiful pattern! I want to make it as a blanket for my daughter, but it has to be all black/grey. So I was thinking of combining the Liquorice Yum Yum whirls with the Liquorice Whirlette to get more black into it. I saw a post from Scheepjes on Insta suggesting this, with a yellow Whirlette, but it only showed a tiny bit and not the entire effect. Do you think this would work? Alternating between Whirl and Whirlette and still get the illusion effect?
Thanks!
Hi Kerstin! Sorry for the late reply! I think it should work, although if you have two of the same colours, the illusion will be lost, so you will need at least a bit of contrast in all areas for the lines to show properly. Have you had a look at the different shawl projects on Ravelry, there may be some inspiration there. I know you want to do a blanket but for the colours, I mean. You could also have a look at the Ravelry page for the Read Between the Lines as it would show the colours in the same way, even though it’s knitted.
Here’s the CBTL projects page:
https://www.ravelry.com/patterns/library/crochet-between-the-lines/people
RBTL projects:
https://www.ravelry.com/patterns/library/read-between-the-lines-2/people
I have started your Crochet Between The Lines Shawl. However, having come to rows 68, 69 and 70 I am having difficulty with the number of stitches as there seems to be some missing in the pattern. Also, difficulty understanding repeat rows 43 – 70 as row 43 only has 23 stitches. I am fairly new to crochet and in total lockdown here but would love to complete this beautiful shawl for the day we can walk freely again.
Hi Mary, without seeing your work, it’s hard to know where you have gone wrong with your stitch count for rows 68-70. The only thing I can think of is that you aren’t working the repeats properly or you forgot some of the increases.
I do get the feeling that you aren’t quite understanding how the repeats work within the rows, though, based on your comments about rows 43-70. So let’s look at that. When you go back and repeat rows 43, when worked the first time, it has only 23 stitches, but in future rows, you will be repeating the stitches within the ( ) brackets as many times as is needed. So however many times it needs to be repeated until you have the 4 sts left. You will see that you are creating illusion stripes which are 7 sts wide, and that is what is included in the brackets, the stripes. Each time you go back and repeat that row, you will do the stitches in the ( ) brackets more times before you reach he final 4 sts, because you will have created more of those vertical illusion stripes.
Good luck and let me know if you need any further help with it!
The stitch counts aren’t given for the following repeats but you are increasing 1 stitch every 2nd row, so you can make a note of that as you go if you find it easier.
I am about a third of the way through After the Party in lavenderlicious and blackcurrant, but I started on the outside! I see from your blog that i should have started in the middle. Quelle horreur! Will it matter? Looks great so far. I love your designs.
Hi Norma! It will be different, but should still be great! I’m pretty sure I’ve seen it done that way at some point. What I think the great thing about these patterns is, you can’t really go wrong. For some (apparently magic) reason, you can throw any two colours together and work them however and it seems to just work out. Working from the inside / outside is totally personal preference so if you like the way the colours are working out, I say keep at it! :)
Hi, do you have this pattern in a Read Between The Lines blanket. I really want to make a blanket for my son.
Hi Barbara, there is no pattern for this as a blanket, but I’ve seen a few others have made one. I think for a decent sized blanket you would probably need 4 whirls. Then you would work the pattern without the increases.
You just need multiples of 7 stitches (for the illusion stripes) plus your edge stitches. Then you repeat rows 43-46 of the pattern, working only what is in between the ( ) brackets. This will give you the shape you need. How many stitches you use depends on how wide you want your shawl, so I will leave that to you. Hope that helps!
On one row there is one spot where I didn’t do the FBSC. Is there anyway I can take thread and fix it without having to frog 20 rows
Thank you SO much for this helpful post. It is especially valuable to those of us who really want to make this but are not on Facebook and so can’t ask questions of other crocheters. (Sure wish Scheepjes would create a place on its website for us all to meet and discuss this so we can avoid FB.) I’m glad I didn’t start until I read your tips!
Hallo rij 68*69,70 lijken niet te kloppen. Ik mis een deel van de instructie. Als ik bij rij 68 de steken optel kom ik niet op 36.
Wat moet er nog meer staan?
Kleur b 1l,4v,(7bvlv,7v) tot laatste 3 st2,v en 2v in laaste s
Hi Danielle,
How many stitches are you getting? The instructions in the pattern are correct, so I’m guessing that you if you have too many stitches, that you did an increase where you shouldn’t have, or didn’t do one where you should. It’s difficult to say without seeing your work or knowing what your stitch count is. There are no errors in the pattern in those rows, though.